> For the complete documentation index, see [llms.txt](https://docs.wafra.sa/llms.txt). Markdown versions of documentation pages are available by appending `.md` to page URLs; this page is available as [Markdown](https://docs.wafra.sa/sales/products.md).
# Products
### Products
Needless to say, the product is an irreplaceable factor in any kind of business. You should always prioritize product management to run a successful business no matter if it is a consumable product or a service product. By considering the significance of the proper management of products in a company, Odoo Enterprise offers a dedicated platform for recording all necessary details regarding product management. This platform will make sure to keep track of vital information related to products that are configured into the system for sales operations. The exclusive product management tool provided by Odoo will benefit you in many aspects of your business. The product configuration tool will assist you in creating a record of all your sales products in an organized manner. In each product configuration window, you will be able to get corresponding tabs to document the accounting, purchase, inventory, eCommerce, and many more data related to product management operations.
Here, we will be discussing the **Products** menu available in the Odoo 16 Sales module. While creating new quotations or sales orders in the Sales module, you are requested to mention the product details. So, creating a record of all sales products is very essential to simplify the creation of quotations or sales orders in the Sales module. By doing so, you can easily select the required product from your system with a single click. The highly integrated nature of the Odoo ERP system will allow the Sales module to work integrated with the Inventory module which will benefit you to get the stock details of the product from the Sales module itself. So, before creating a sales order, make sure to configure the required products to the Sales module.
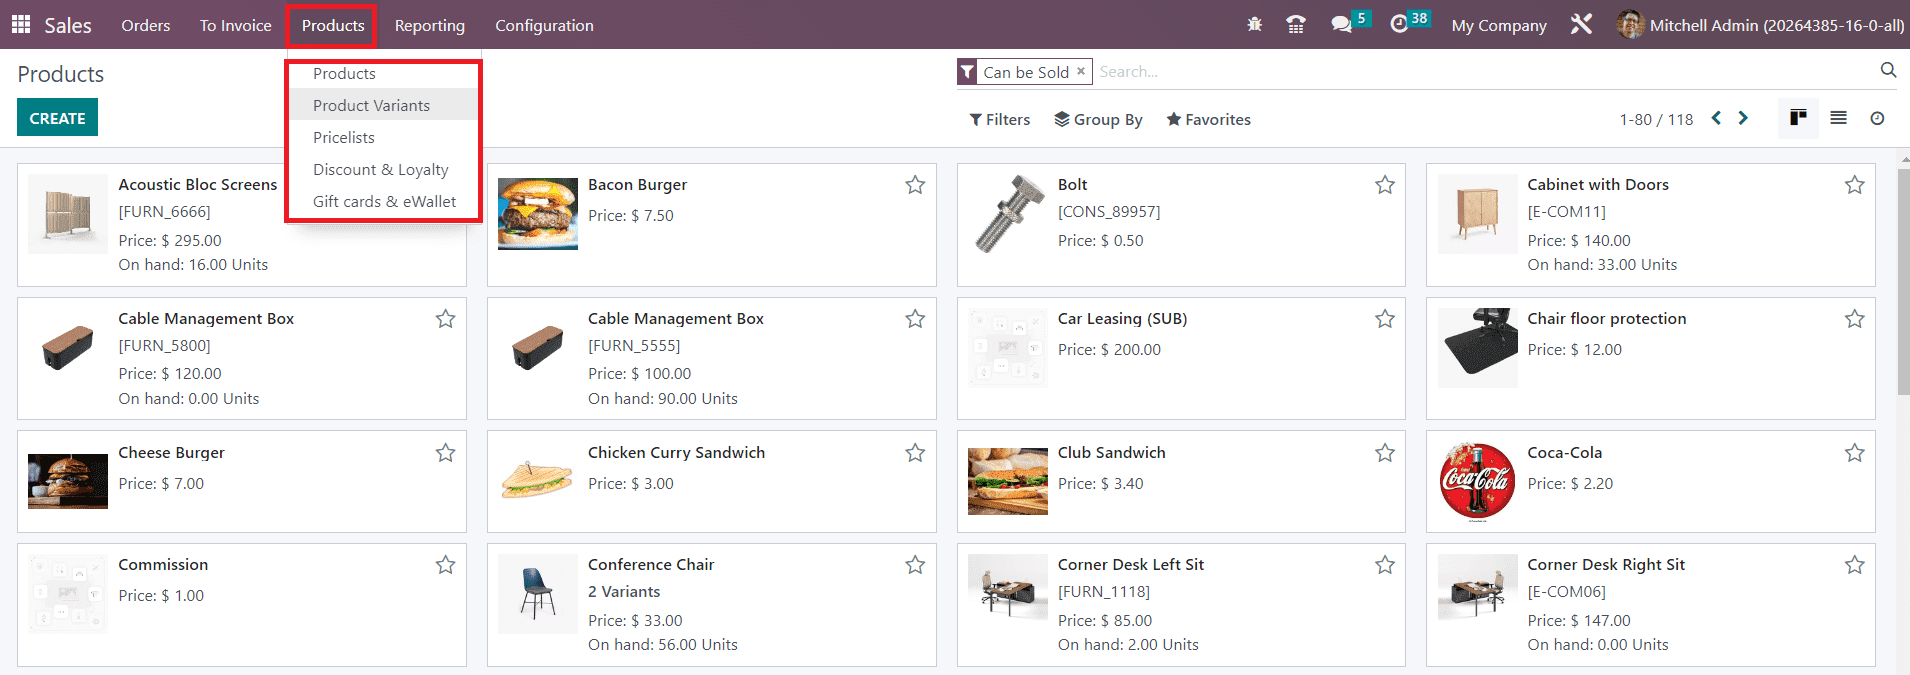
As you can see in the screenshot below, the **Products** menu will be shown in the main menubar of the Odoo Sales module under which you will get sub-menus such as **Products, Products Variants, Pricelists, Discount & Loyalty, and Gift Cards & eWallet.**
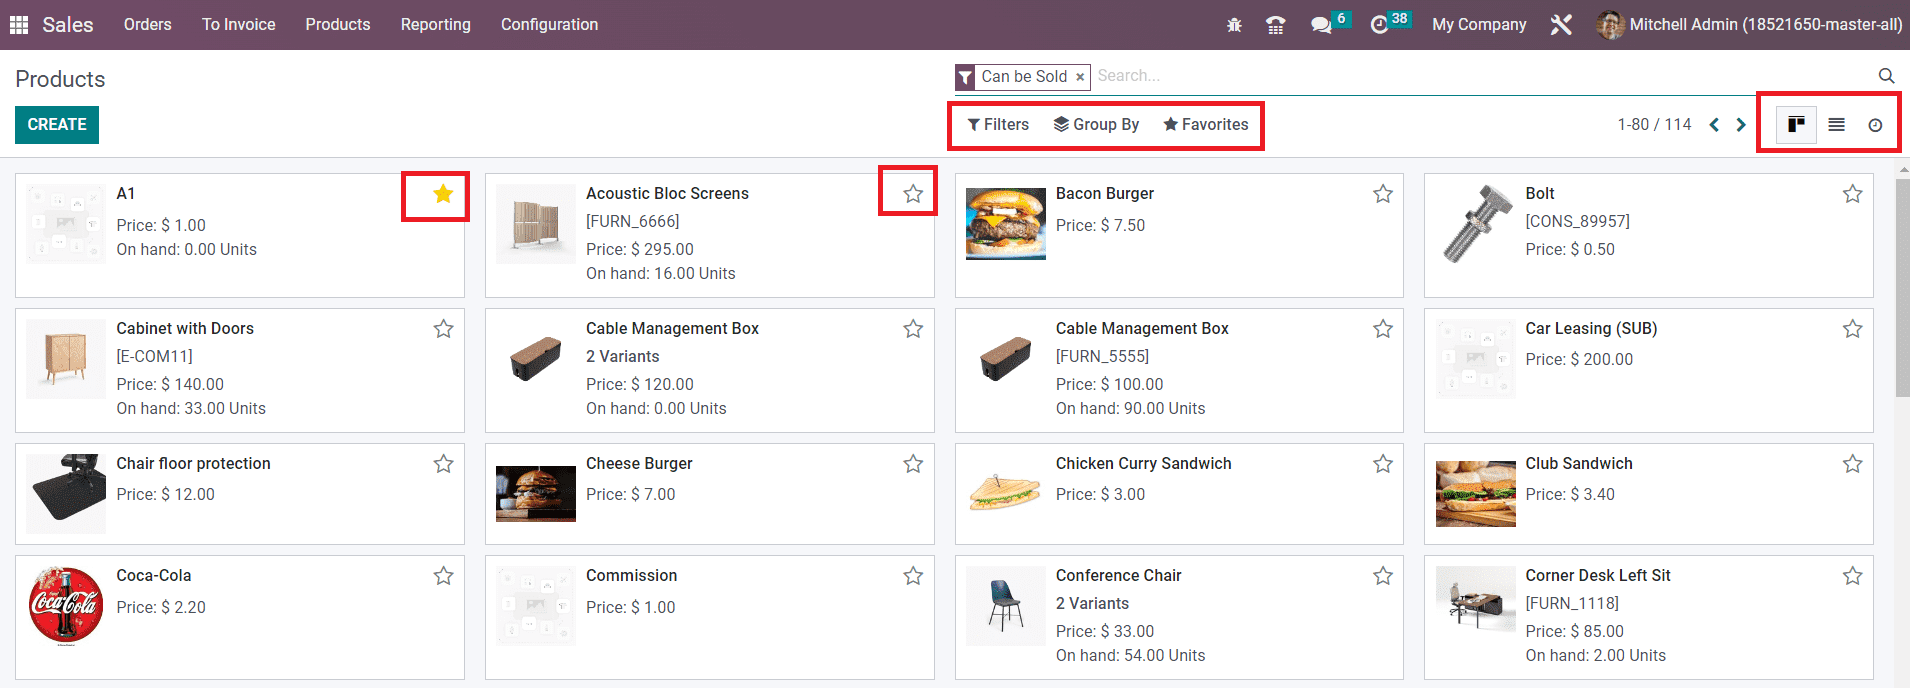
We will discuss each of these sub-menus in detail. First, let’s take a look at the Product management window in the Sales module. As soon as you select the **Products** sub menu, Odoo will direct you to a new window that will give you a view of all the configured products in the Sales module. This window can be viewed in Kanban as well as List view. The screenshot given below is the Kanban view of the Product management window.
Just like we observed in the CRM module, the icon that represents the Kanban view has changed in Odoo 16. Apart from the kanban and list views, you will get an additional view on this platform which is Activity which will show the list of activities scheduled for different sales-related operations for different products. Regardless to say, the Filters and Group By options are available in this window also to simplify the sorting process. Customizable options are available in both sorting options so that you can easily retrieve the required data within seconds. You will get a star icon on each product which can be used to add a product to your favorite list.
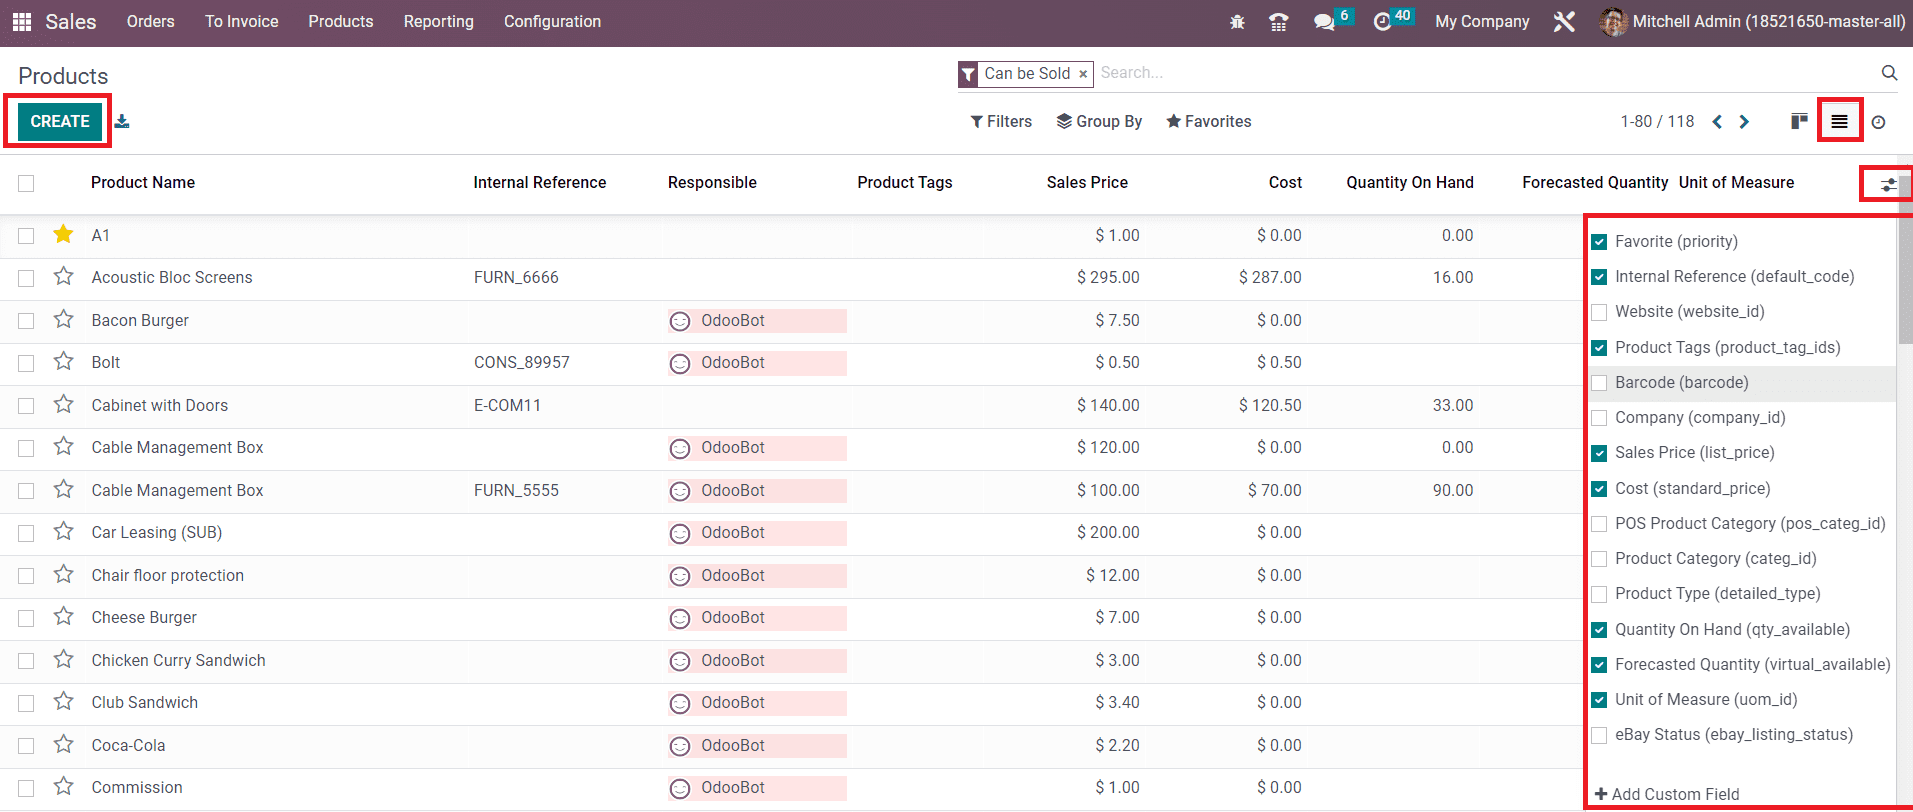
The List view of the product window displays the details of the Product Name, Internal Reference, Responsible, Product Tags, Sales Price, Cost, Quantity on Hand, Forecasted Quantity, and Unit of Measure. You can add additional default fields as well as custom fields to the list view using the icon given on the right corner of the window as marked in the screenshot below.
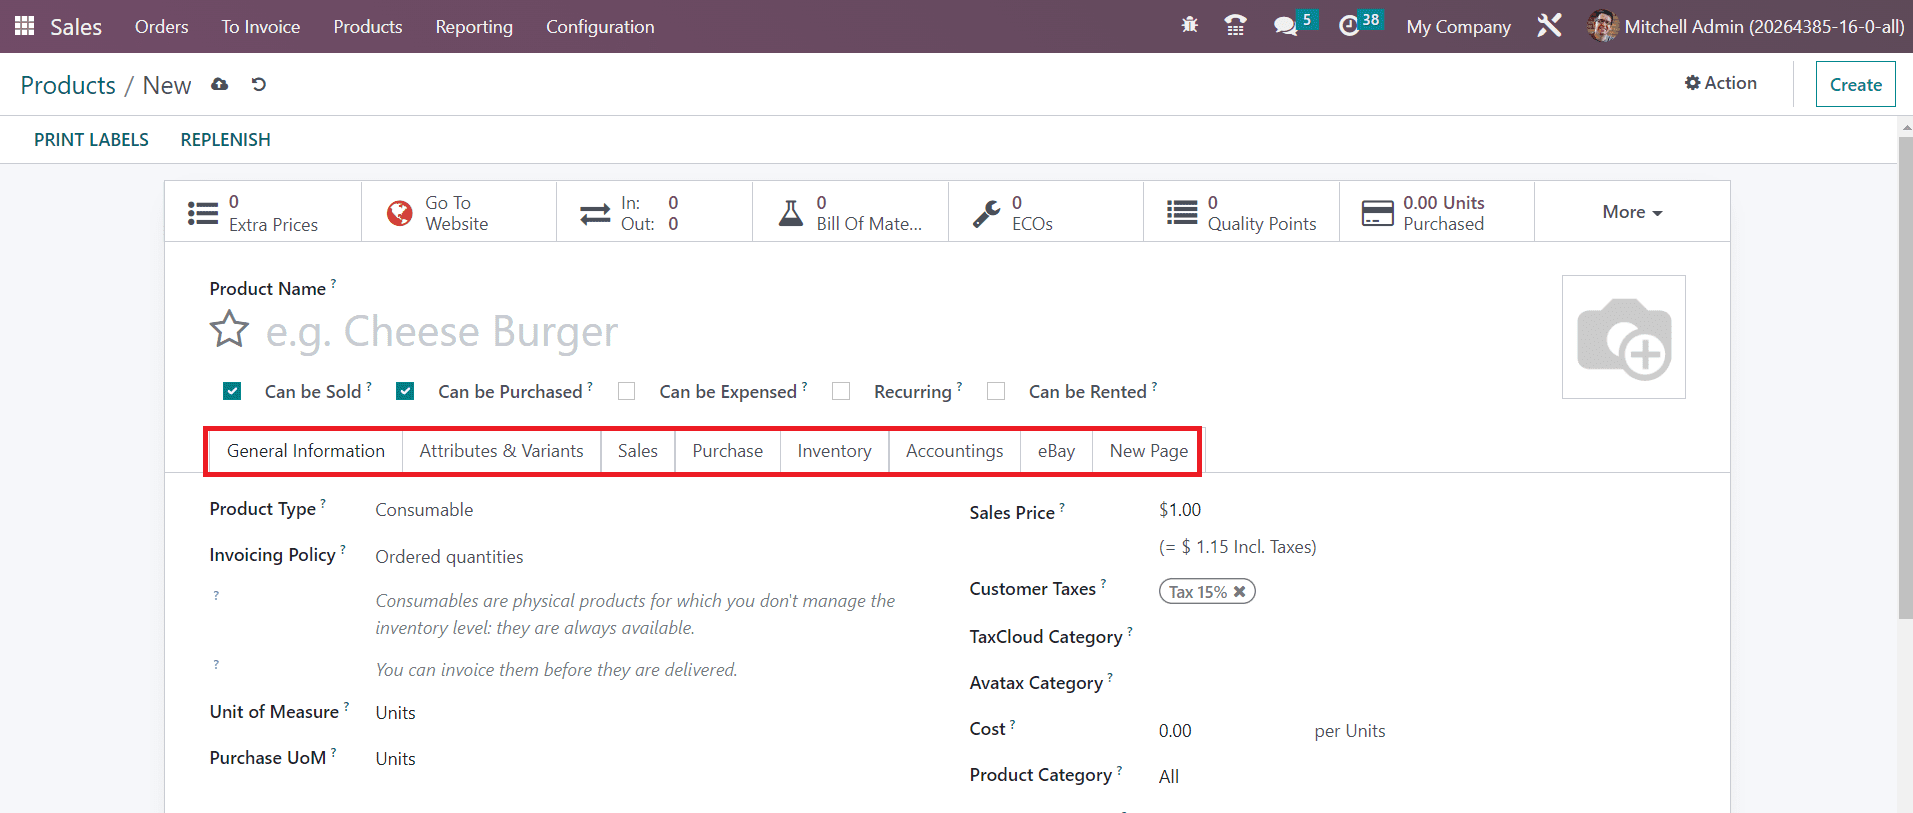
Now, let’s take a look at the configuration of new products in the Odoo 16 sales module. If you want to make changes to the available products, you can select the required products from the given list and edit them. In order to create a new record, you are instructed to click on the **Create** button. The new product configuration window is shown below.
The name of the product can be mentioned in the **Product Name** field. As we mentioned earlier, you can use the star icon to add this product to your favorite list. This product can be sold, purchased, expensed, recurring, and rented based on the option you select. You can choose the **Can be Sold** option if you want to sell this product. Selecting the **Can be Purchased** option will configure this product as a purchasable product. The product can be selected at an expense by selecting the **Can be Expensed** option. Confirming a sales order with this product will create a subscription by selecting the **Recurring** option. Odoo will allow you to rent the product by choosing the **Can be Rented** option.
The Sales module works integrated with many major modules in Odoo. Based on the modules installed in your database, you will be able to get advanced tabs in the product configuration window. Let’s discuss each of them in detail.
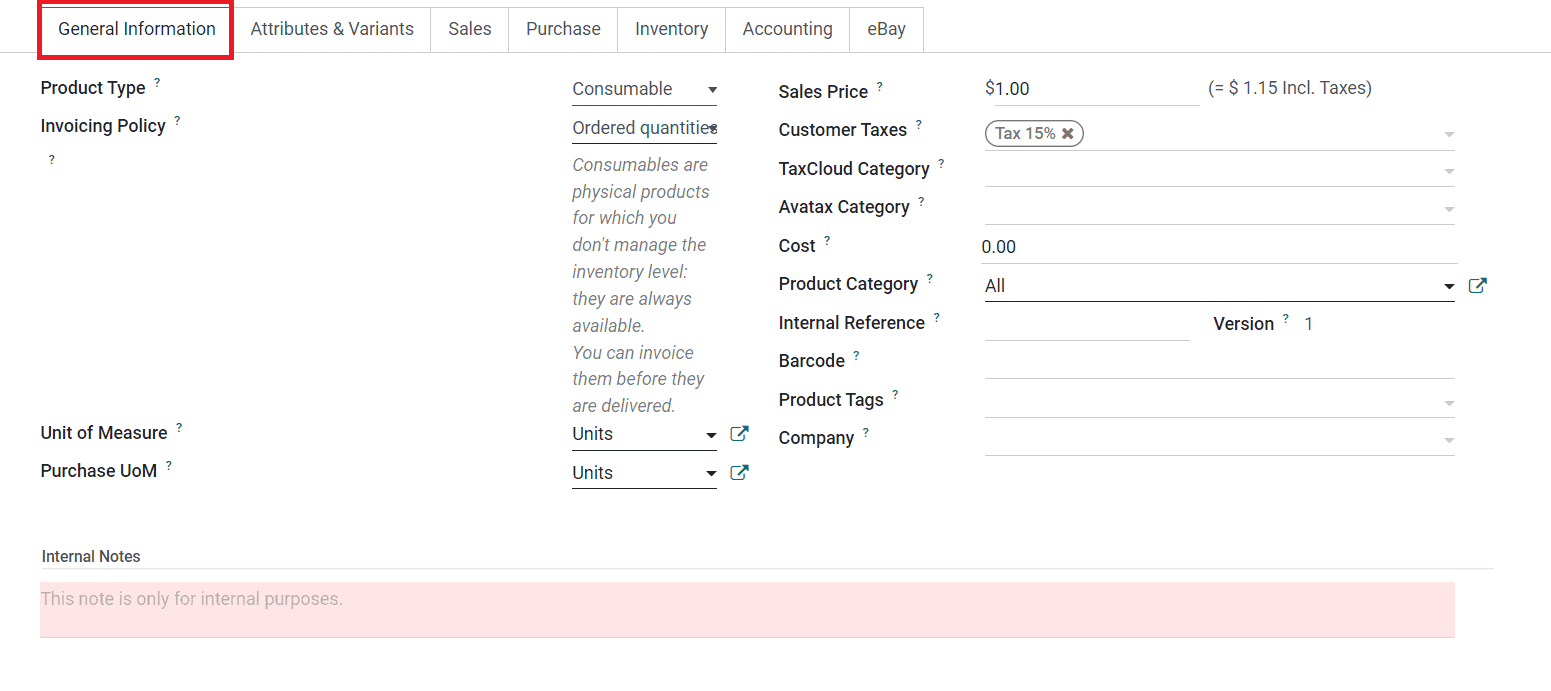
The **General Information** tab is used to mention the general data regarding the product. You can select the suitable **Product Type** from the given options.
There are Consumable, Service, Storable Products, Event Tickets, Course, and Event Booth product types available in Odoo. A **Storable product** is a product for which you manage stock. The Inventory module has to be installed to manage the storable products. **Consumable products** are physical products that don't demand any stock management. These are always available. A **Service** is a non-material product you provide for your customers.
After mentioning the Product Type, you can set the **Invoicing Policy.** You can set invoicing policy on ordered quantity or delivered quantity based on the demand. You can invoice quantities ordered by the customer by choosing the invoicing policy as **Ordered Quantities.** By selecting the invoicing policy as Delivered Quantities, Odoo will generate invoices for the quantities delivered to the customer. You can set a default unit of measures that can be used for all stock operations in the **Unit of Measure** field. The **Purchase UoM** field can be used to set the default UoM purchase orders. It must be in the same category as the default unit of measure. The price at which the product is sold to customers can be added in the **Sales Price** field. The **Customer Taxes** field indicates the default taxes used when selling the product. Mention the **TaxCloud Category** in the corresponding field. This refers to TIC (Taxability Information Codes) which is used by TaxCloud to compute specific tax rates for each product type. The value set here prevails over the one set in the product category.
In the corresponding fields, you can specify the **Cost, Product Category, Internal Reference, Barcode, Product Tags,** and **Company.** The **Internal Notes** available in the **General Information** tab can be used to add notes for internal purposes.
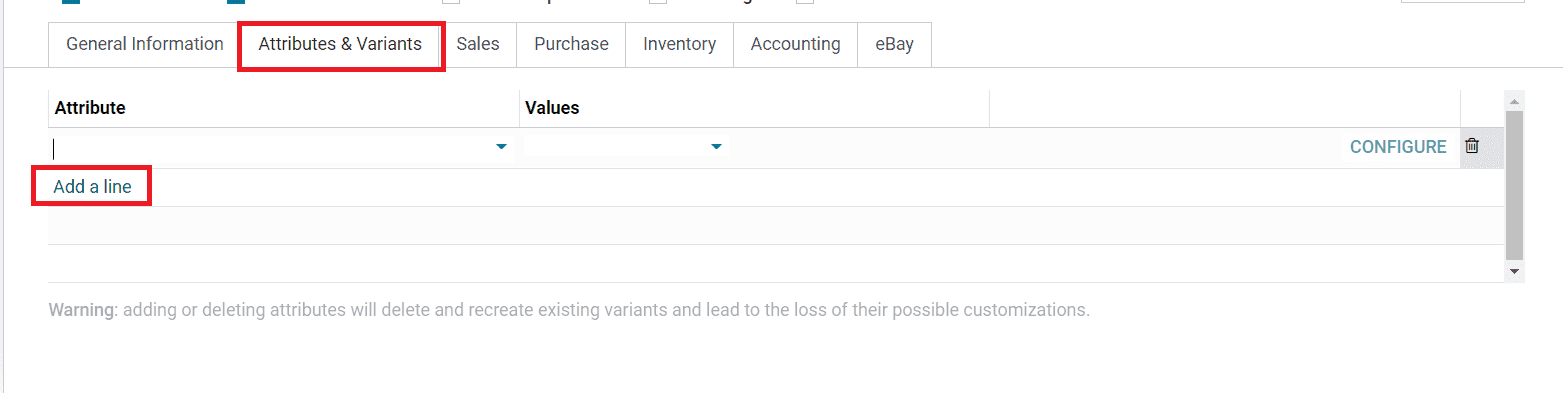
Sometimes a product may contain multiple variants with different attributes. All those attributes and variants of a product can be listed under the **Attributes & Variants** tab.
Using the **Add a Line** button, you can add the Attribute and corresponding Values in the given spaces.
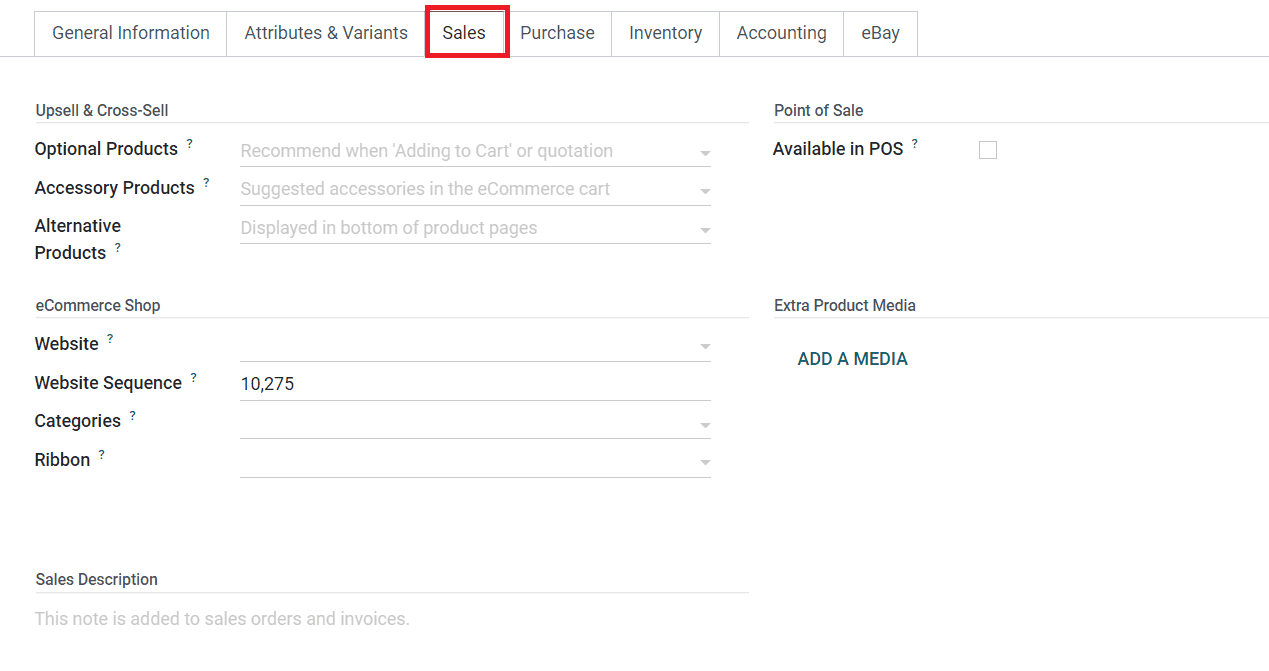
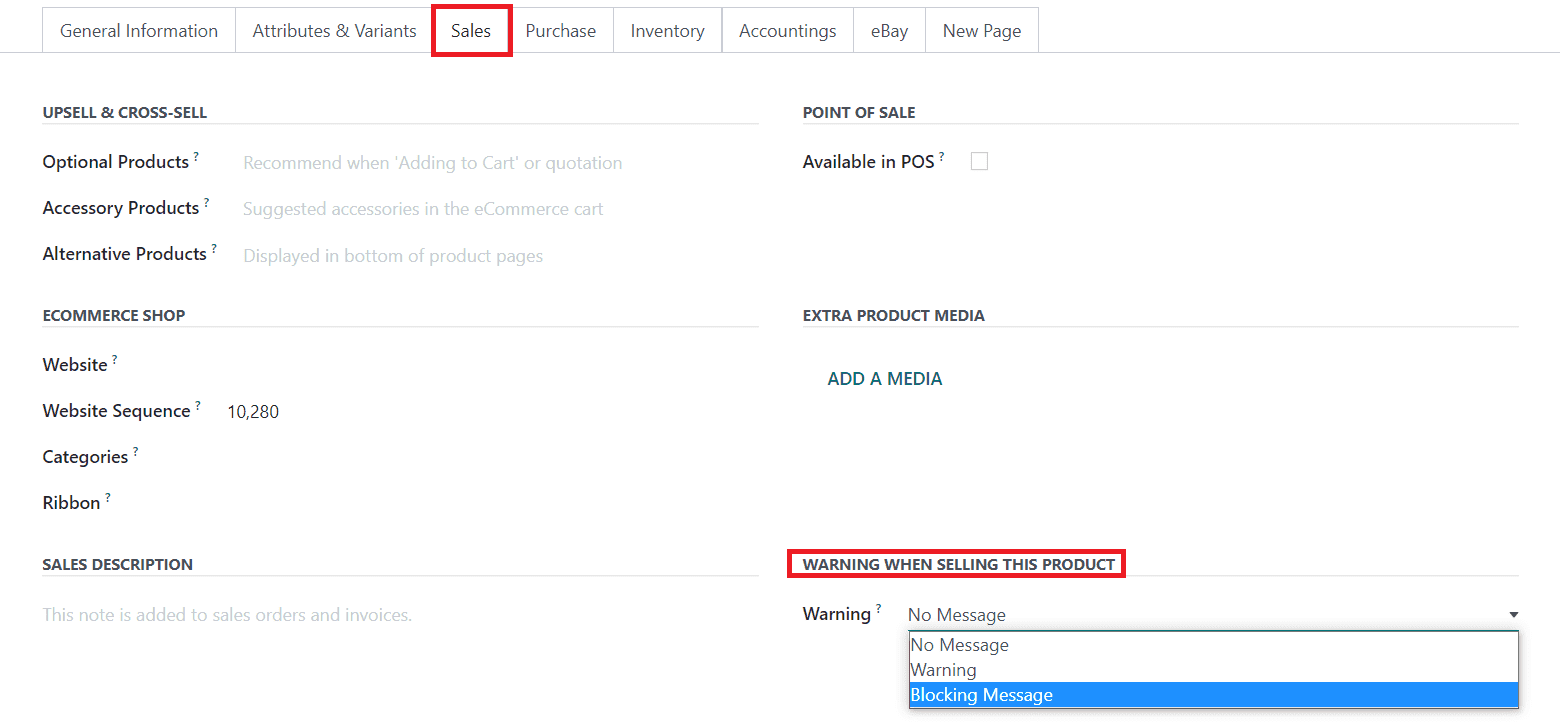
The sales-related details of the new product will be recorded under the **Sales** tab of the product configuration window. You can use this tab to define your upselling and cross-selling strategies, eCommerce shop, and point of sale. The screenshot depicted below shows the Sales tab of a product. Under the **Upsell & Cross-Sell** field, you can define the **Optional Products, Accessory Products,** and **Alternative Products** in the respective spaces.
**Optional Products:** It is a coss-sell strategy that suggests related products whenever the customer hits the ‘Add to Cart’ button on the eCommerce page.
**Accessory Products:** This is also a cross-sell strategy that suggests related products when the customer reviews the cart before payment.
**Alternative Products:** It is an upsell strategy that suggests alternatives to a product on the product page.
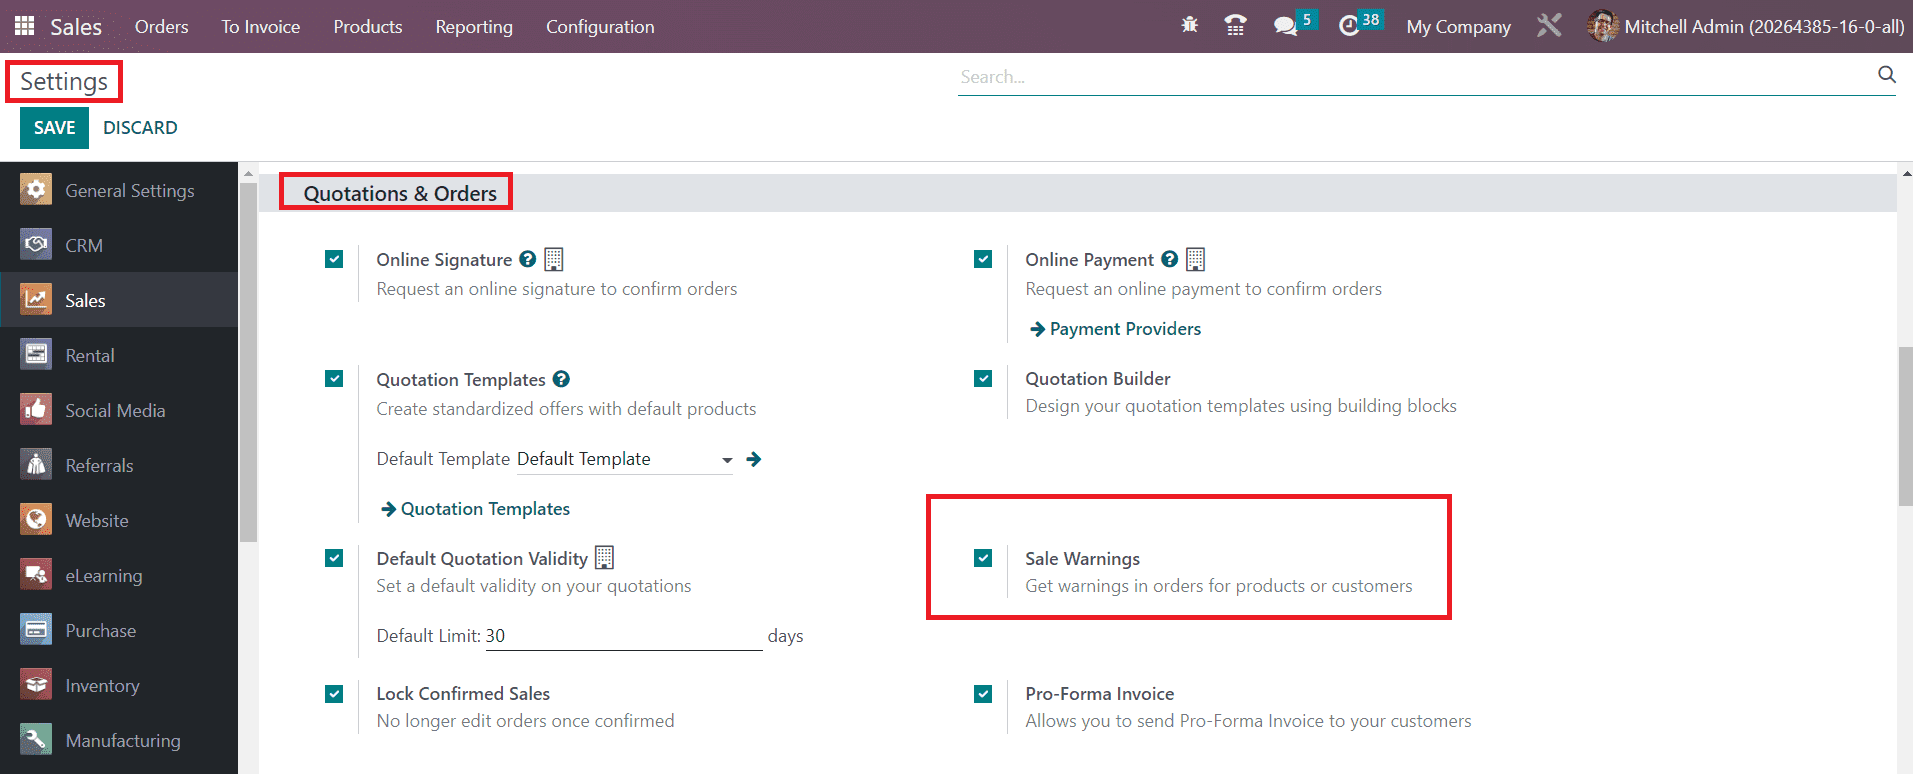
Here, Odoo offers you an option to generate warning messages on products. You can activate this feature from the **Settings** menu of the Sales module. Using this feature, you can set warnings and block messages on a product.
Under the **Quotation & Orders** tab, you can find the option to activate the **Sale Warnings.** As soon as you activate this option, you will get the field Warning in the sales tab of the product configuration window to set a warning when selling that product.
The action can be set as Warning, Blocking Message, or No Message. Selecting the Warning option will send a warning message to the user and you can specify the message in the given space. By selecting the Blocking Message, Odoo will block the flow.
Under the **Commerce Shop** field, you can specify the details regarding your eCommerce website to publish the product for online sales. The **Website Sequence** will determine the display order on the eCommerce page. The **Categories** field can be used to mention the eCommerce category of the product. While publishing a product on an eCommerce page, you can add ribbons on them like New, Out of Stock, Limited Stock, etc to attract customers. Such ribbons can be mentioned in the **Ribbons** field. If you want this product to appear at the point of sale, you are allowed to enable the **Available in POS** POS option given under the **Point of Sale** field. Using the **Add a Media** button, you can upload **Extra Product Media** related to the product.
The **Sales Description** field will help you to specify sales-related notes which will be added to the sales orders and invoices of this particular product.
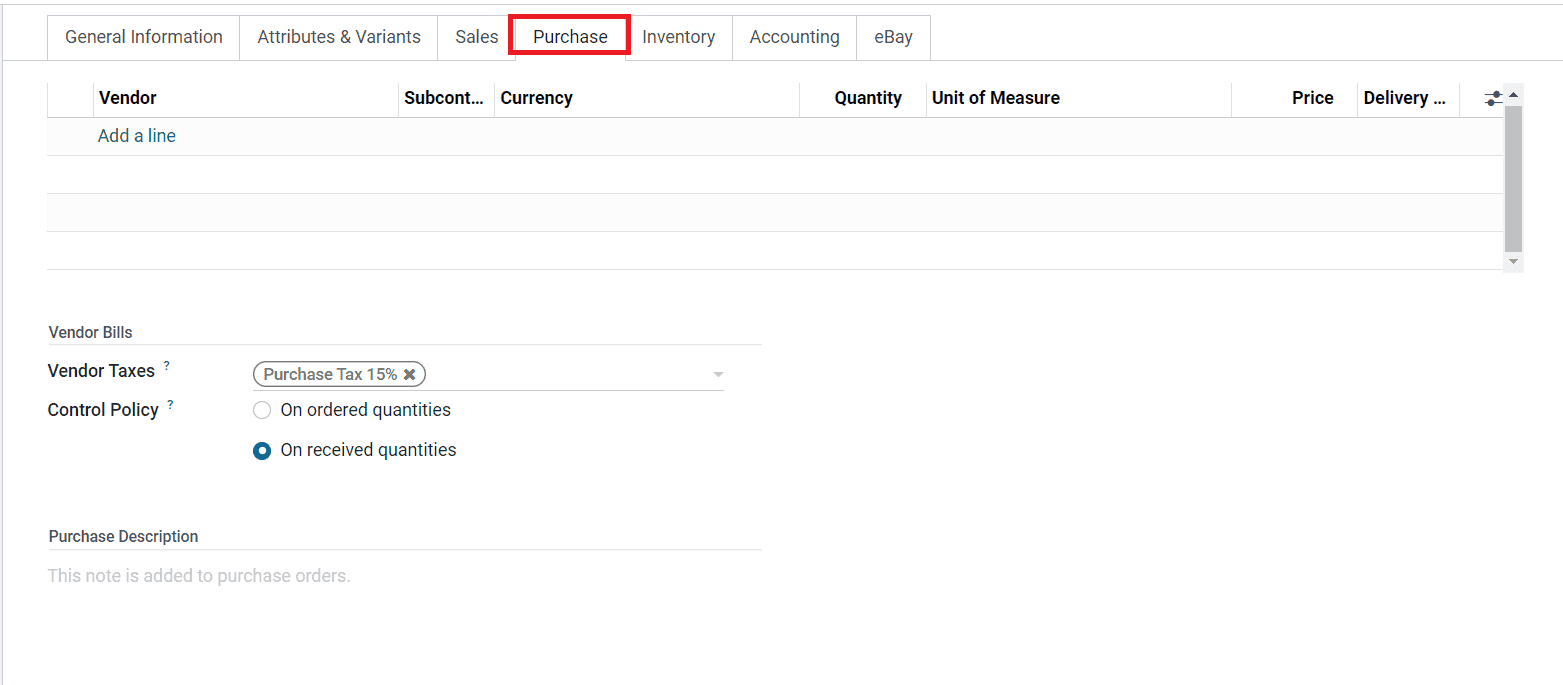
If you are configuring a purchasable product the purchase-related details can be defined under the **Purchase** tab. Here, you can specify the **Vendors** of the product using the **Add a Line** button. You can add multiple vendors to a product using this button. If you want to subcontract the product, you can enable the **Subcontract** field.
Mention the **Currency** suitable for your purchase operations with the selected vendor, the **Quantity** to purchase from this vendor to benefit from the price expressed in the vendor product unit of measure, the default **Unit of Measure** used for purchase orders, the Price to purchase this product, and the **Delivery Lead Time** in the respective fields. The Delivery Lead Time is the lead time in days between the confirmation of the purchase order and the receipt of the product in your warehouse.
The default taxes used when buying the product can be added in the Vendor Taxes field. The **Control Policy** can be set on Ordered Quantities (control bills based on ordered quantities) or Received Quantities (control bills based on received quantities). The notes described in the **Purchase Description** field will be added to purchase orders.
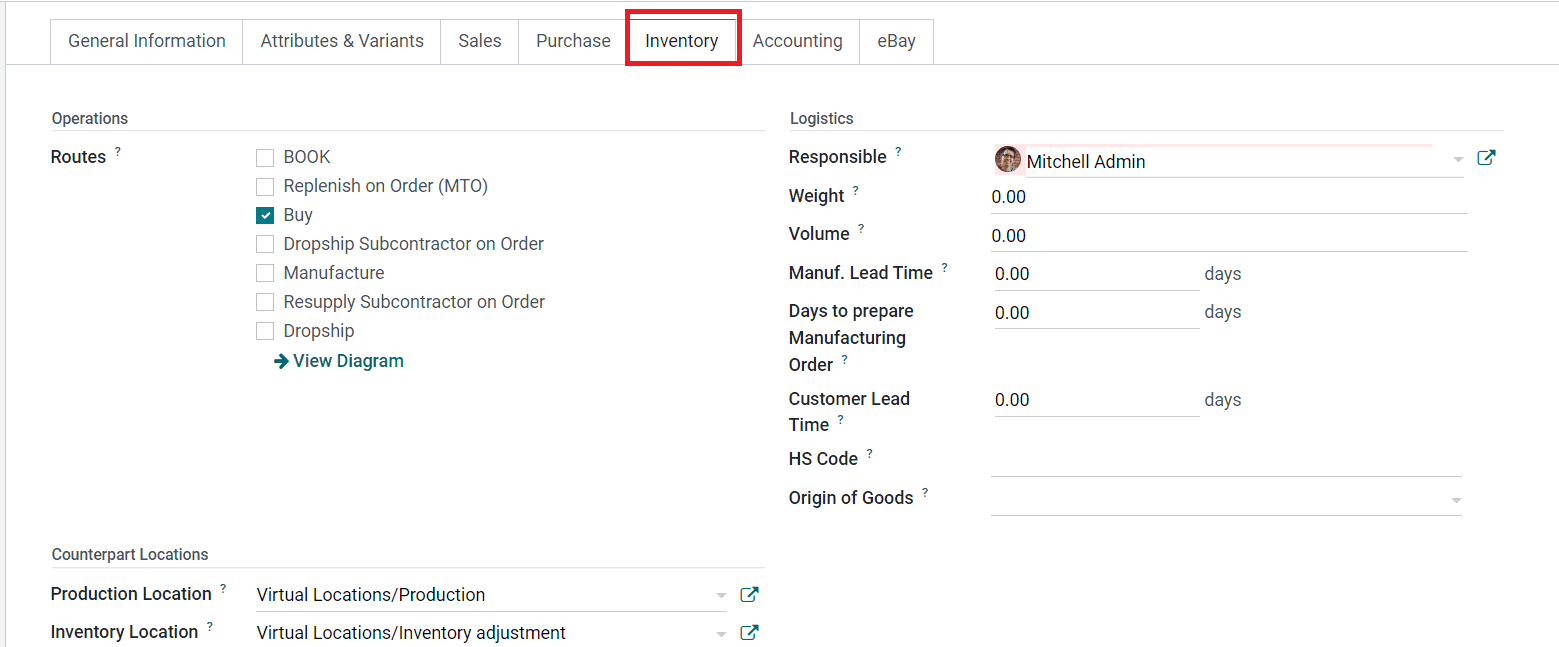
The essential information to manage the inventory of the product will be available under the **Inventory** tab of the product configuration window as depicted above. The **Routes** of Operations of the particular product can be selected from the given option. Based on the modules installed in your database, this will allow you to define the route of the product. Under the **Logistics** field, you can mention a user in the **Responsible** field. This user will be responsible for the next activities related to the logistic operations for this product. The **Weight** and **Volume** of the product can be defined in the respective fields.
You can define the **Manufacturing Lead Time** in the given field which is the average lead time in days to manufacture this product, in the case of multi-level BOM, the manufacturing lead time of the components will be added. In case the product is subcontracted, this can be used to determine the date on which components should be sent to the subcontractor. You will also get a field to specify the number of **Days to Prepare Manufacturing Orders** . In the **Customer Lead Time,** you can mention the delivery lead time in days. It’s the number of days promised to the customer, between the confirmation of the sales and the delivery. Mention the **HS Code** in the corresponding field which is a standardized code for international shipping and goods declaration. At the moment, it is only used by the FedEx shipping provider. The **Origin of Goods** field will determine where goods originate, i.e. not where they have been shipped from, but where they have been produced or manufactured.
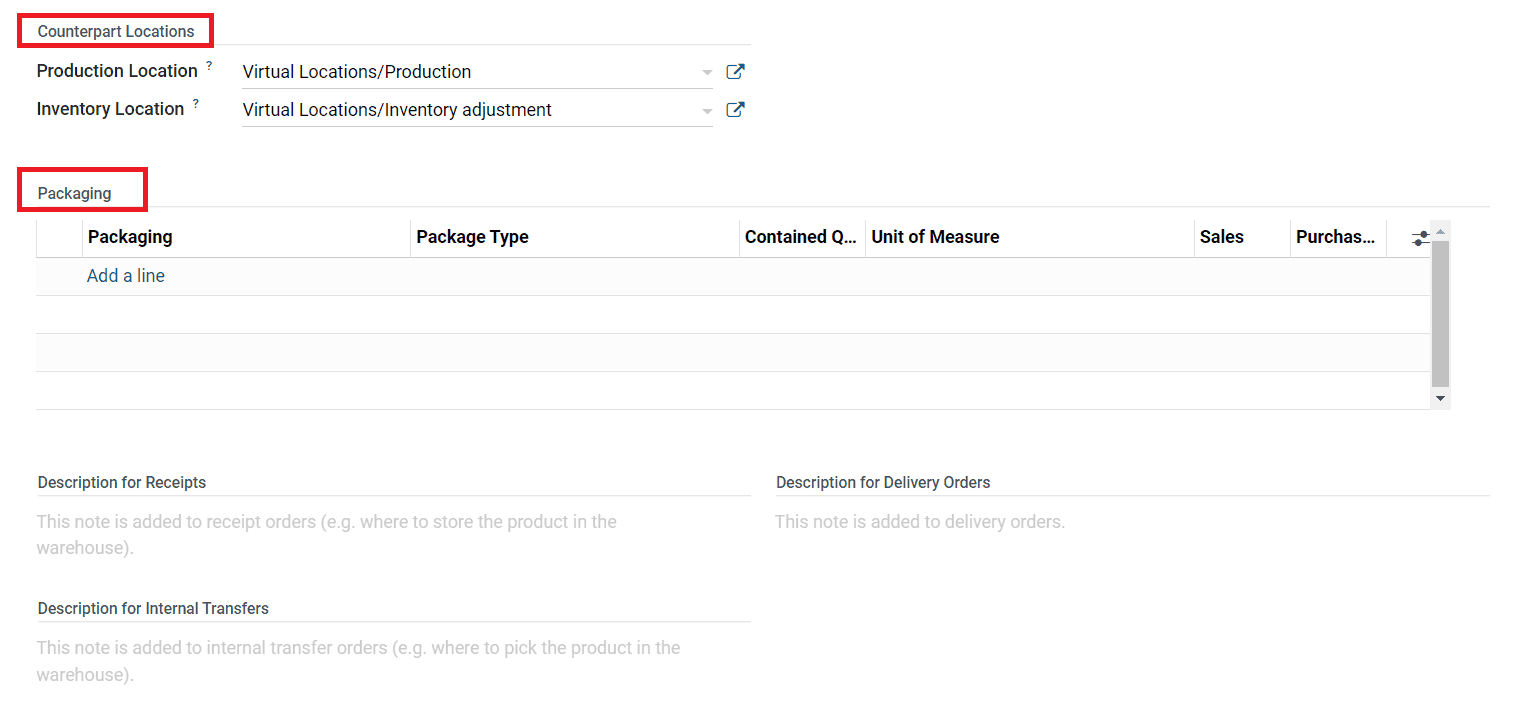
Under the **Counterpart Location** field, you will get two locations to define.
**Production Location:** This stock location will be used, instead of the default one, as the source location for stock moves generated by manufacturing orders.
**Inventory Location:** This stock location will be used, instead of the default one, as the source location for stock moves generated when you do an inventory.
In the **Inventory** tab, you will get an additional field to specify the packaging methods by enabling the **Packaging Methods** option from the **Settings** menu of the Sales module.
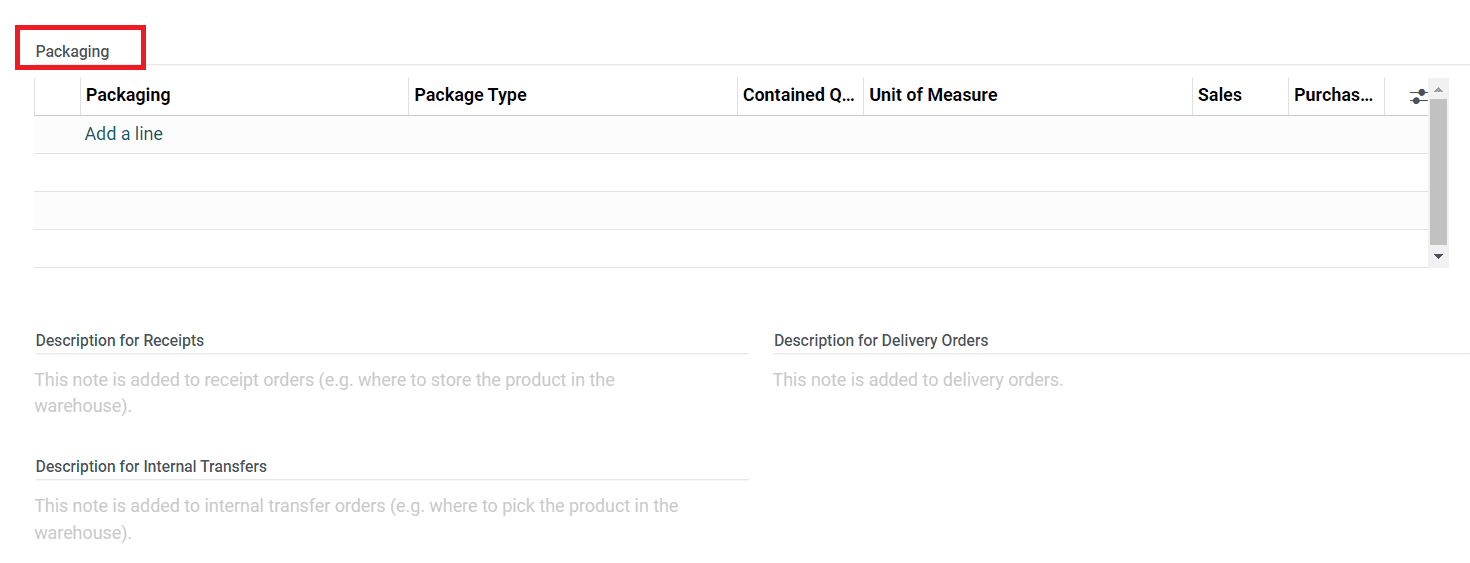
As soon as you activate the option, you will get the field to define the packaging methods as shown in the image below.
Using the **Add a Line** button, you are allowed to add Packaging along with the Package Type, Contained Quantity (Quantity of products contained in the package), Unit of Measure, Sales Order, and Purchase Order. Additionally, you can add notes in the **Description for Receipts, Description for Delivery Orders, and Description for Internal Transfers** in the respective fields.
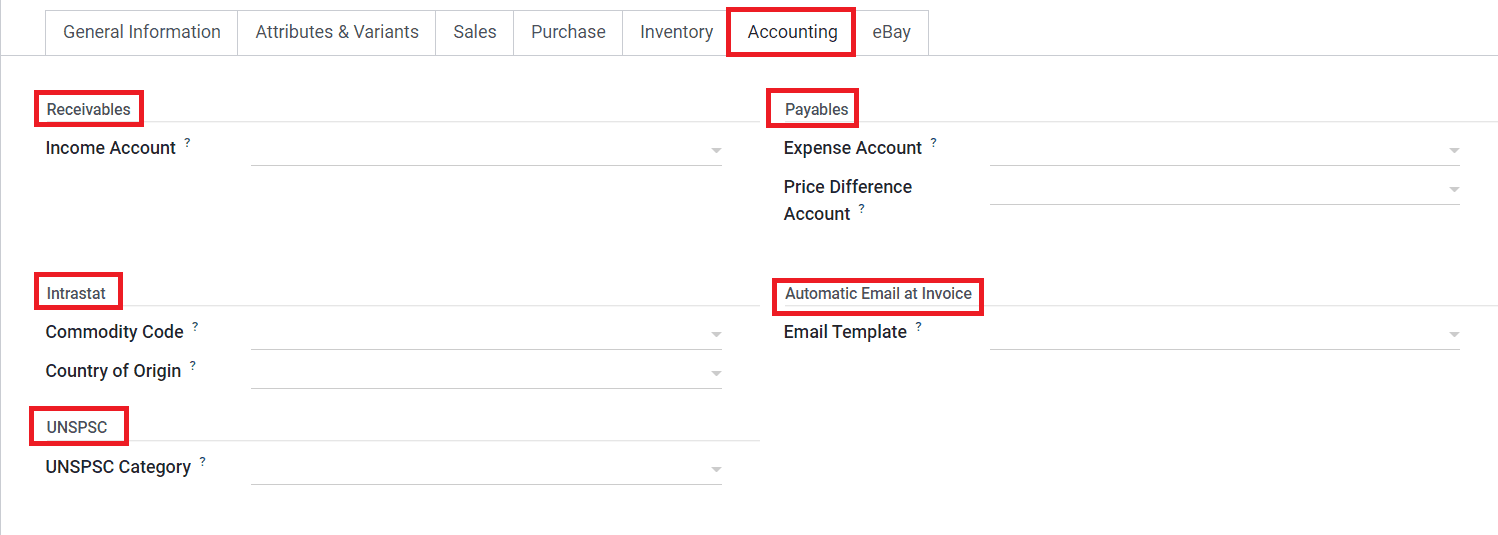
The **Accounting** tab will be helpful to record the accounting details of a product.
In the **Receivables** field, you can mention the **Income Account** and in the **Payables** field, you can mention the **Expense Account** . The **Price Difference Account** is used in automated inventory valuation to record the price difference between a purchase order and its related vendor bill when validating this vendor bill. Under the **Intrastat** field, you can define the **Commodity Code** and **Country of Origin.** By defining an **Email Template** in the **Automatic Email at Invoice** field, Odoo will automatically send a product-specific email once the invoice is validated. The UNSPSC code related to the product can be defined in the **UNSPSC Category** field.
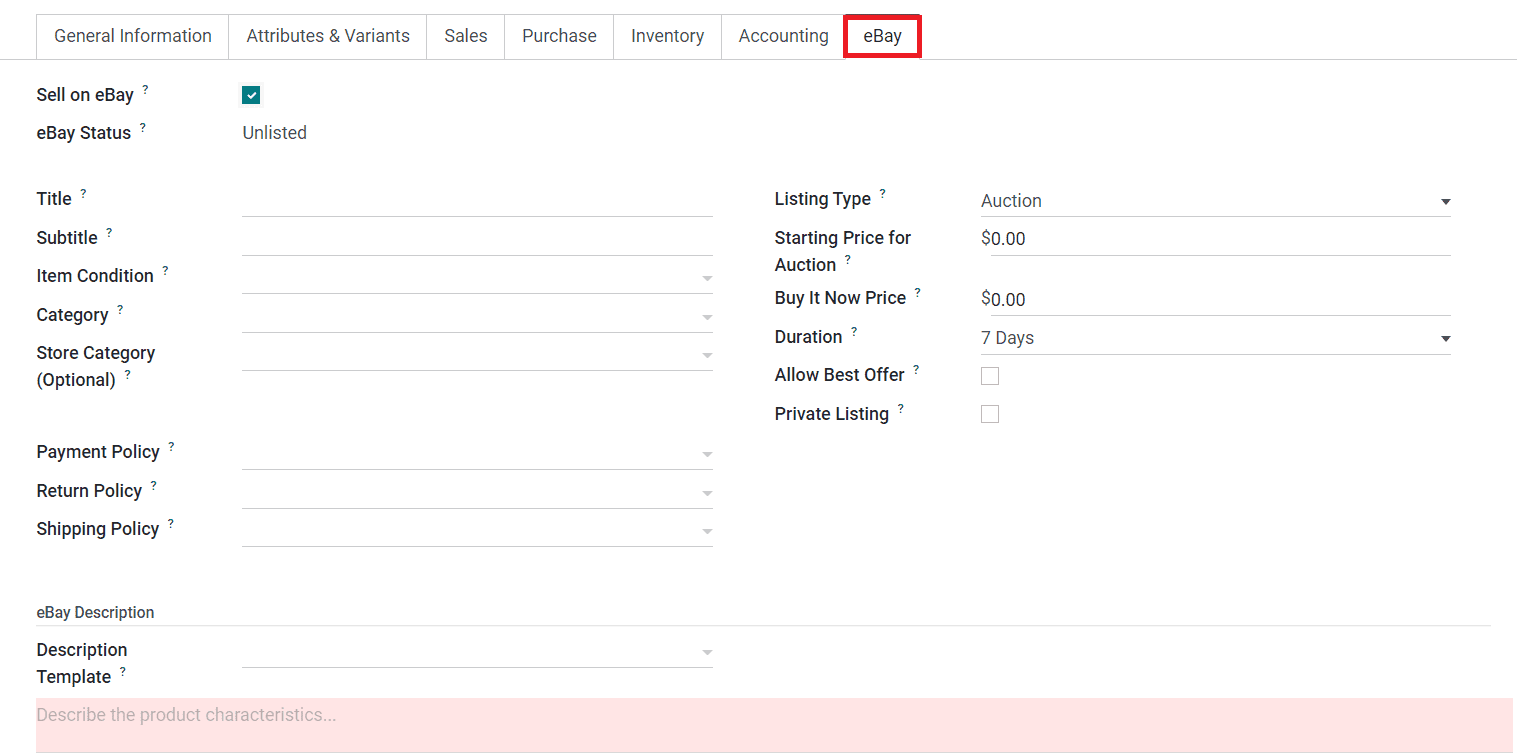
You can sell this product on eBay by activating the **Sell on eBay** option under the **eBay** tab.
You will be able to get the **eBay Status** of the product in this tab. In the respective fields, you can mention the Title, Subtitle, Item Condition, Category, Store Category, Listing Type, Starting Price for Auction, Buy it Now Price, Duration, Allow Best Offer, and Private Listing. The policies related to eBay selling of the product such as the Payment Policy, Return Policy, and Shipping Policy can be defined in the given fields. Under the **eBay Description** tab, you can add a Description Template related to the characteristics of the product.
We discussed all available tabs in the product configuration window. This is how we configure products in the Odoo 16 Sales module.
#### Product Variants
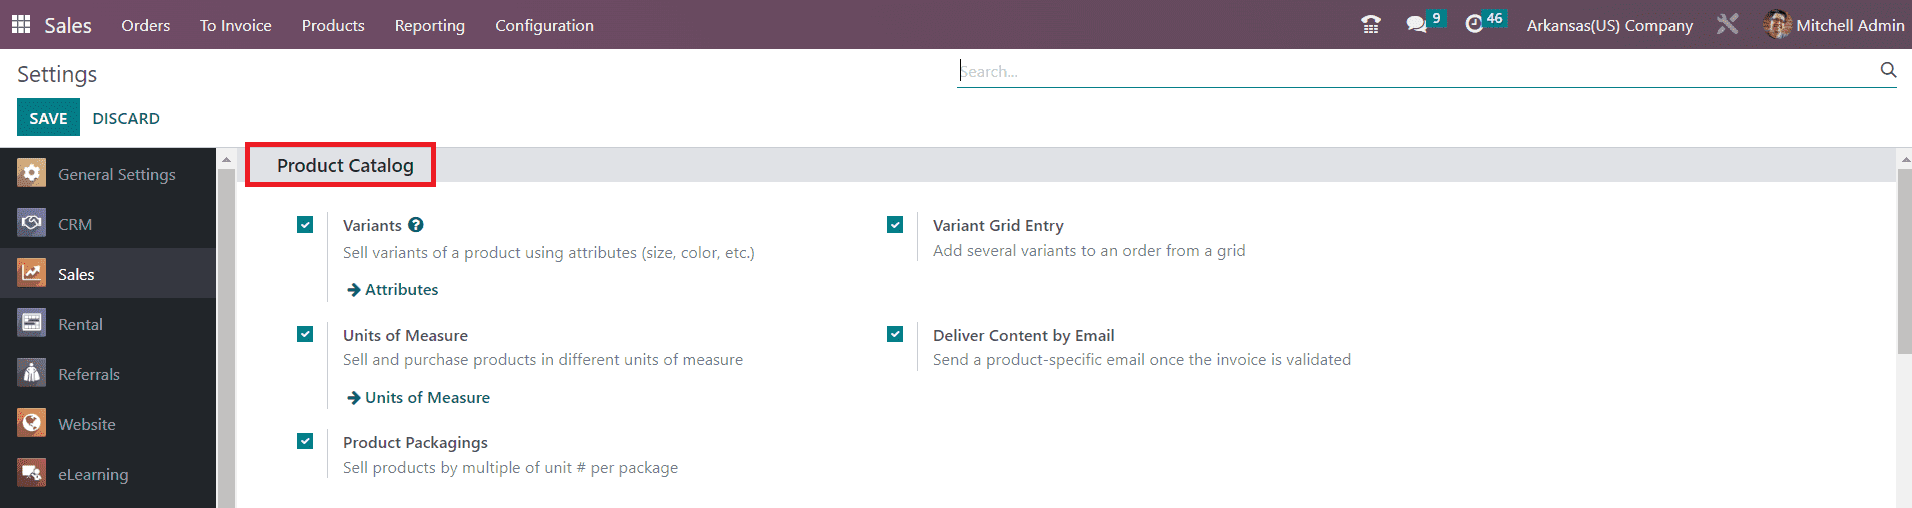
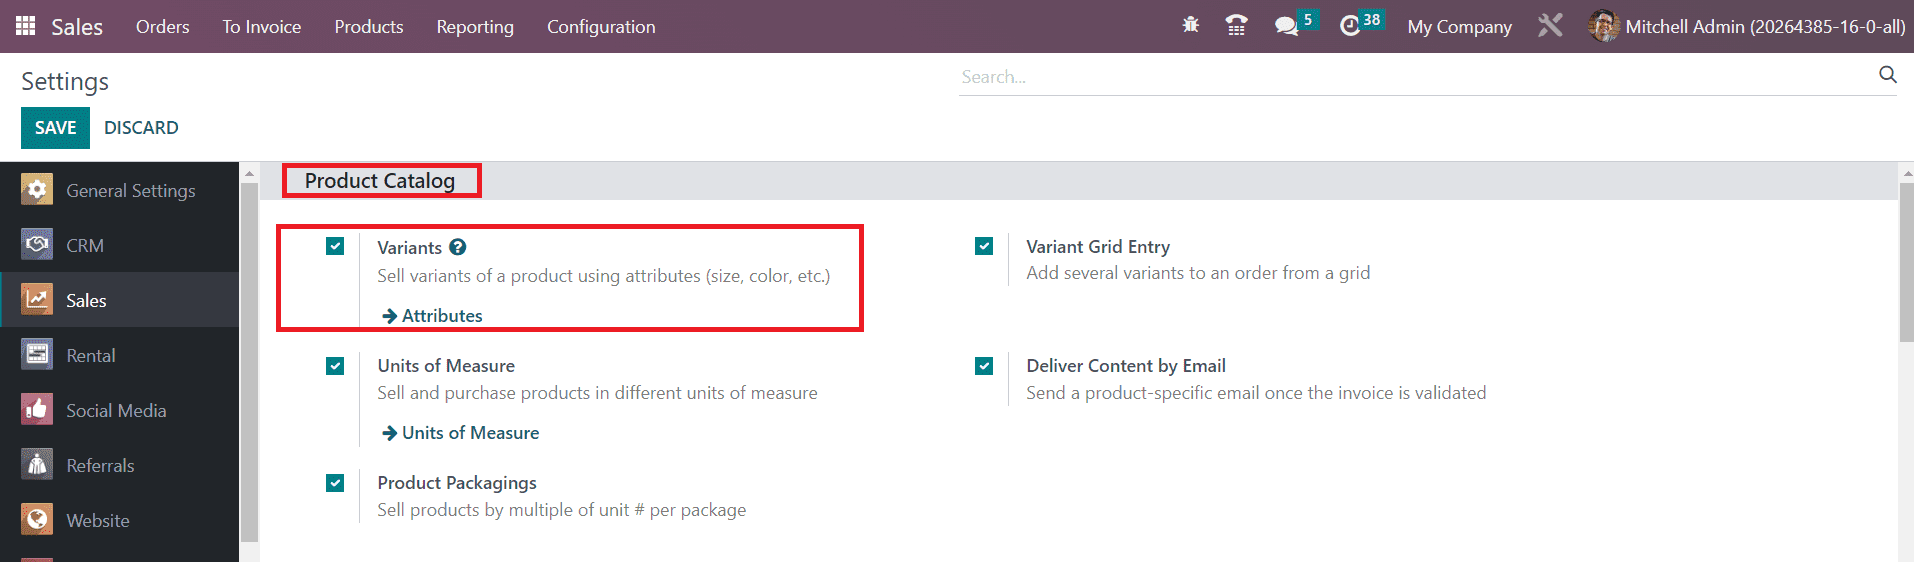
You can offer more varieties of a product to your customers by configuring its variants in the Odoo Sales module. From the **Settings** menu, you can activate the **Variants** feature. The screenshot given below shows the **Settings** menu of the Sales module. Here, you will get the **Variants** option to activate under the Product Catalog tab. Activating this feature will allow you to sell variants of a product using attributes.
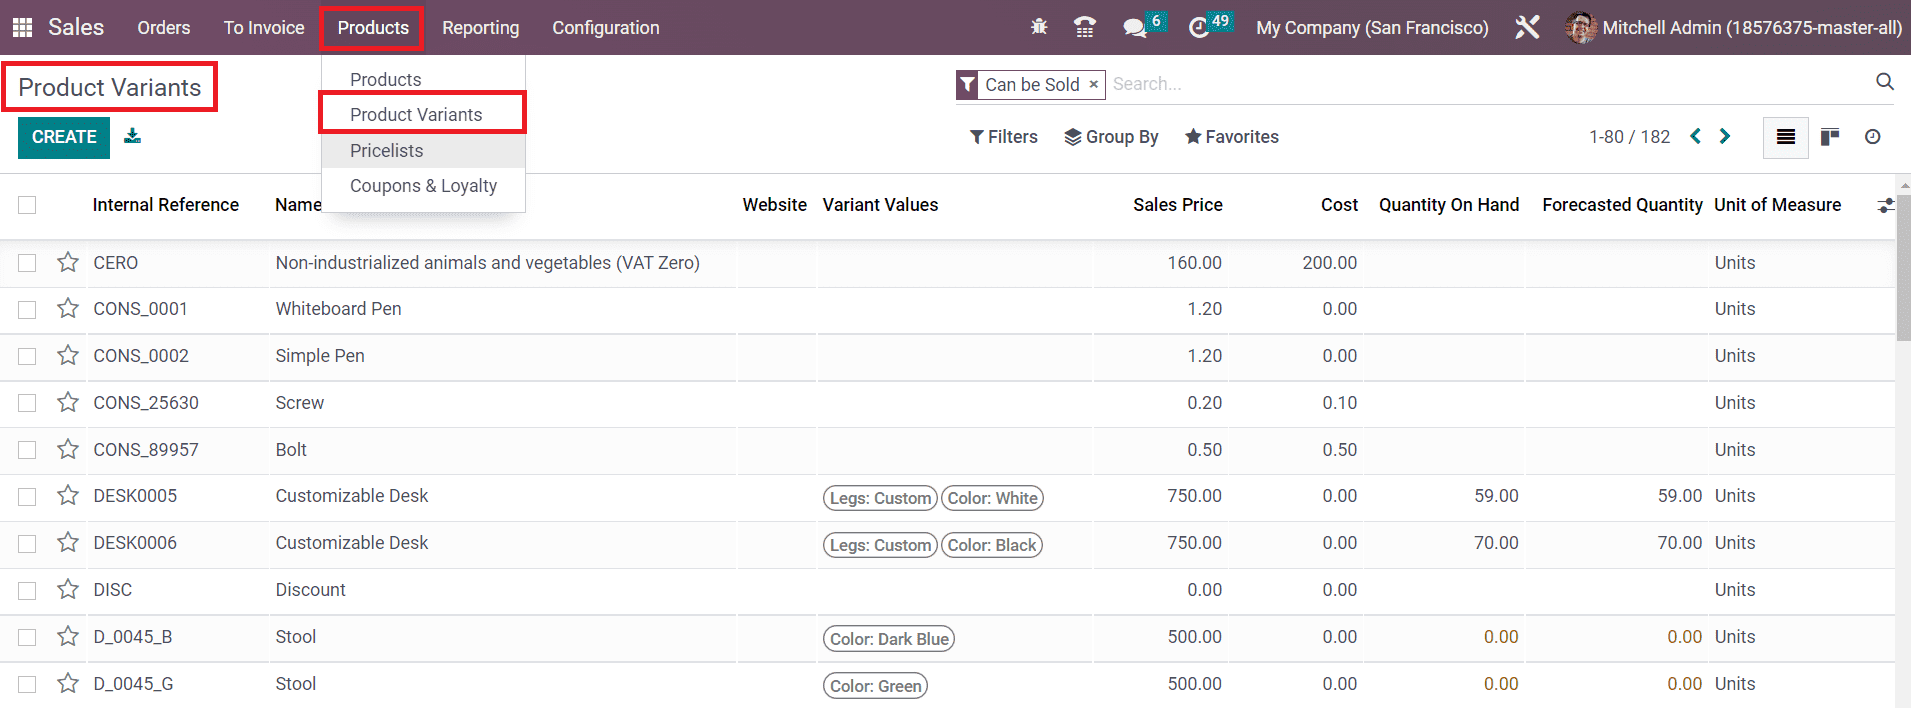
Using the **Product Variants** option under the **Products** menu will assist you to configure new variants of a product to your database. The configuration of variants of a product is similar to the product configuration that we discussed earlier.
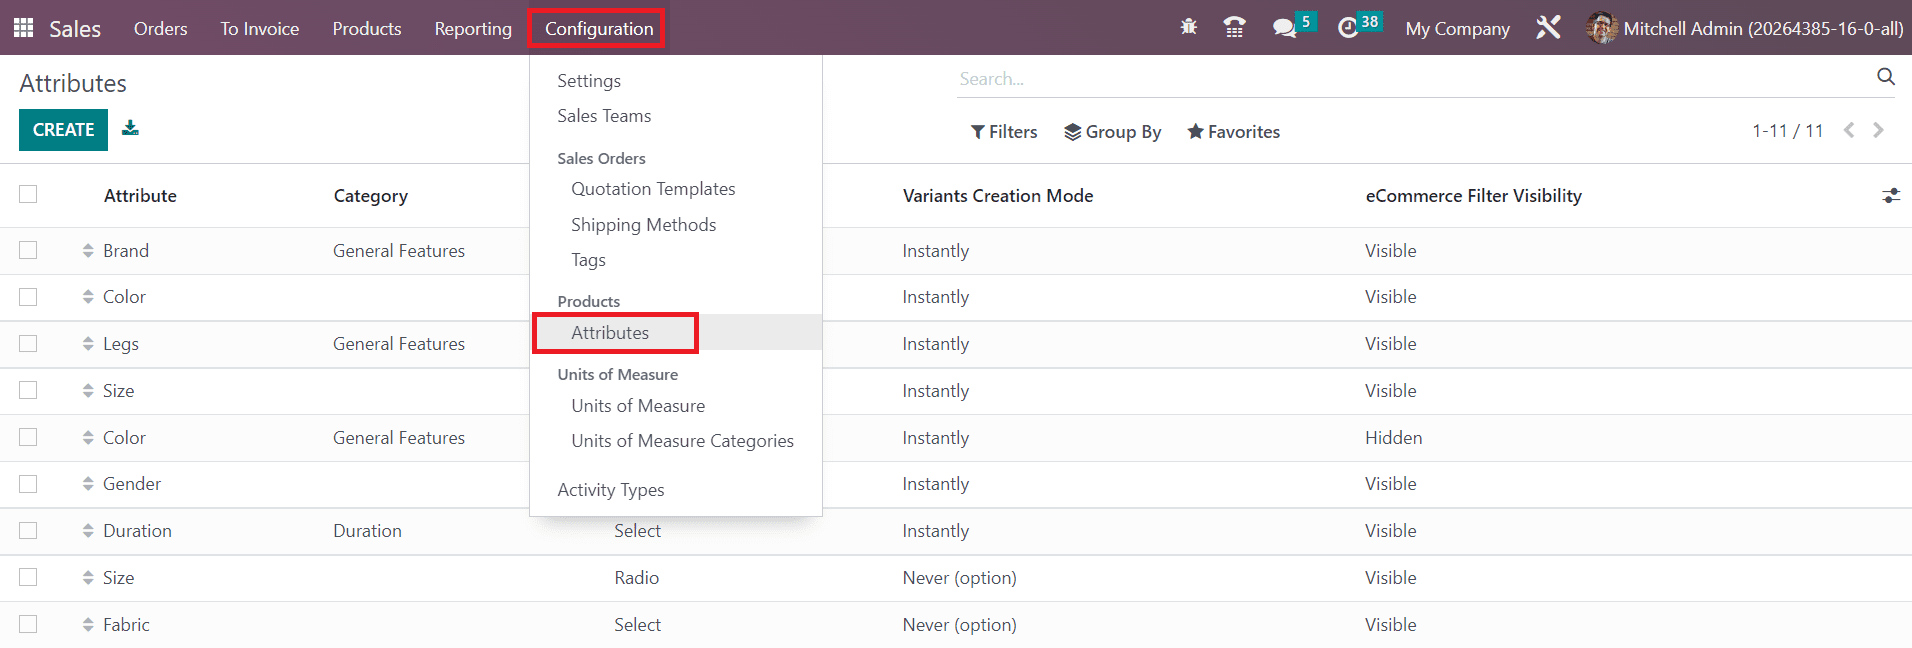
The list of already configured Product variants can be seen as shown in the image above. Using the **Create** button, you can easily add a new one by following the same method of product configuration. You can configure different attributes for the products to define their variants from the **Configuration** menu of the module. Click the **Attributes** option from the Configuration menu as shown below.
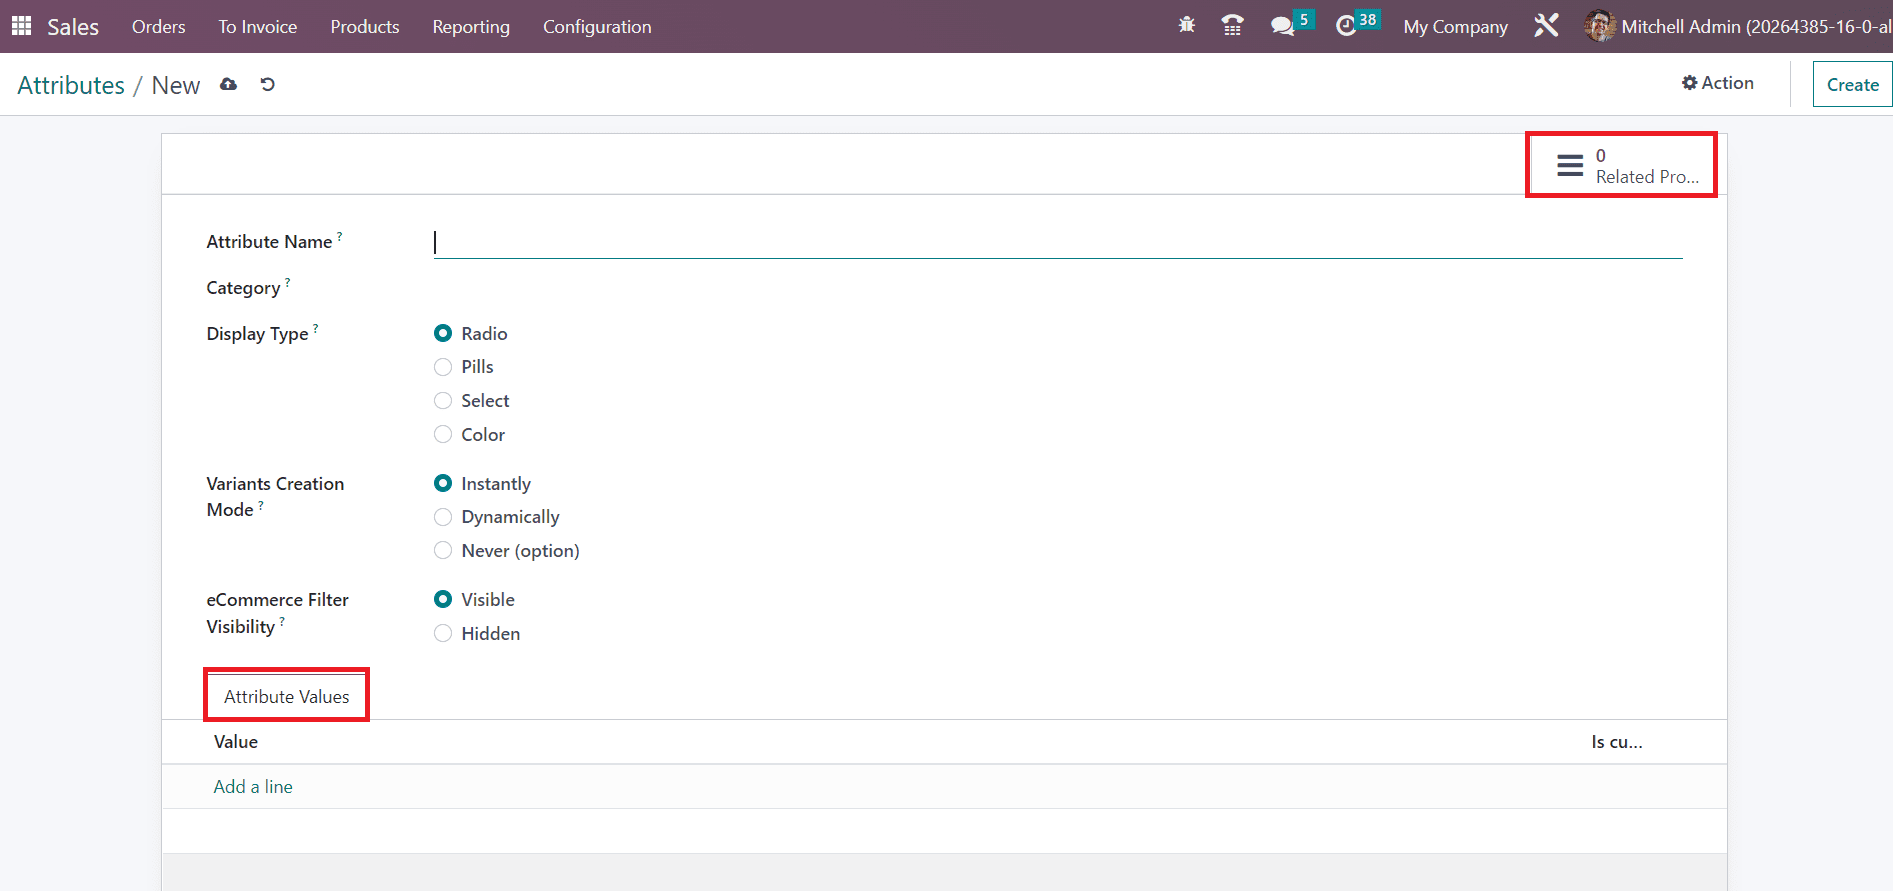
A list view of the Attributes will appear on your screen with the details of the Attribute, Category, Display Type, Variants Creation Mode, and eCommerce Filter Visibility. Use the **Create** button to add a new attribute to your system. as Instantly, Dynamically, or Never. By selecting the Instantly option, all possible variants will be created as soon as the attribute and its values are added to a product. The variants will be created only when their corresponding attributes and values are added to a sales order by selecting the Dynamically option. Variants are never created for the attributes by choosing the Never option in the **Variants Creation Mode.**
In the **Attribute Name** field, you can specify the name of the attribute. Set a category to regroup similar attributes under the same section in the Comparison page of eCommerce. The **Display Type** used in the Product Configurator can be set as Radio, Pills, Select, or Color as per your preference. You can set the **Variants Creation Mode**
The attribute will be available in the ecommerce filter by selecting the **Visible** option from the **eCommerce Filter Visibility** field. You can hide this attribute from the filter in the website by selecting the **Hidden** option. Under the **Attribute Values** tab, you can mention the Values of the attribute one by one using the **Add a Line** button. The smart button Related Products will show the list of products with this attribute.