# Product Managemnet
### Product Management
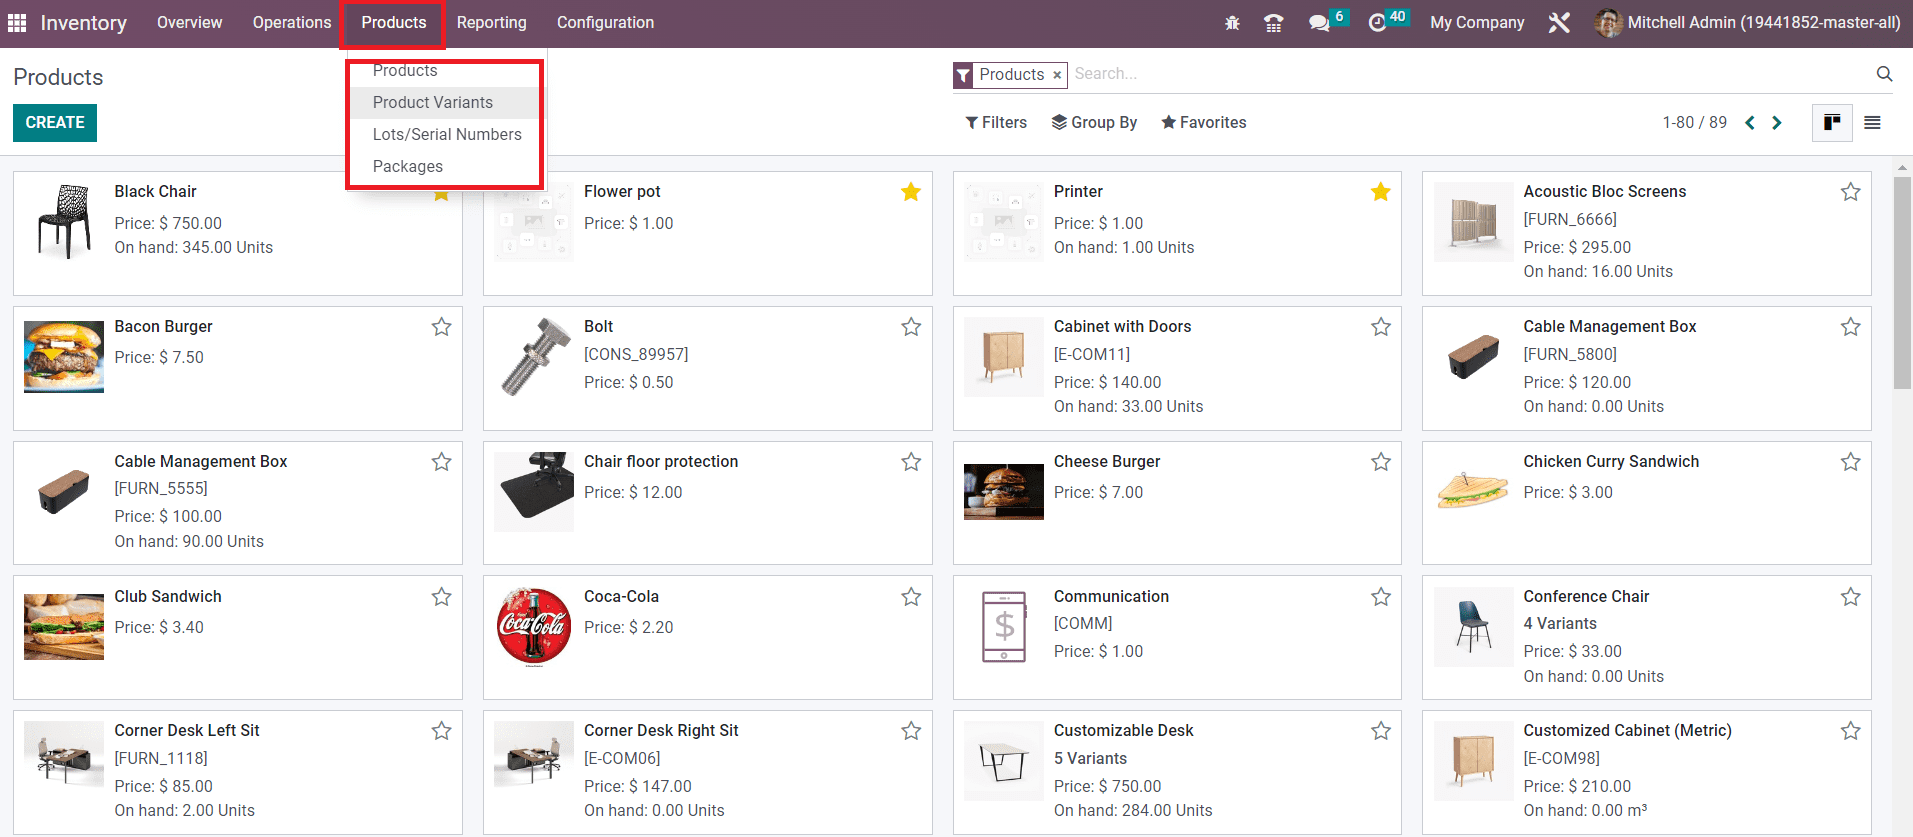
Recording every aspect related to a product is very crucial for the effective maintenance of inventory. Odoo Inventory module enables you to configure new products in your database that will effectively track and monitor all operations to enhance the inventory management of the respective products. The process of product configuration in the Inventory module is almost similar to that of the Sales and Purchase modules. You will get a separate menu in the main menu bar of the Inventory called **Products** that includes all submenus for the effective product management in Odoo.
You will get the Products, Product Variants, Lots/Serial Number, and Packaging options under the Products menu as shown in the image above.
All configured products can be easily observed by clicking on the **Products** option. First, we are going to discuss the configuration of new products using the **Products** menu.
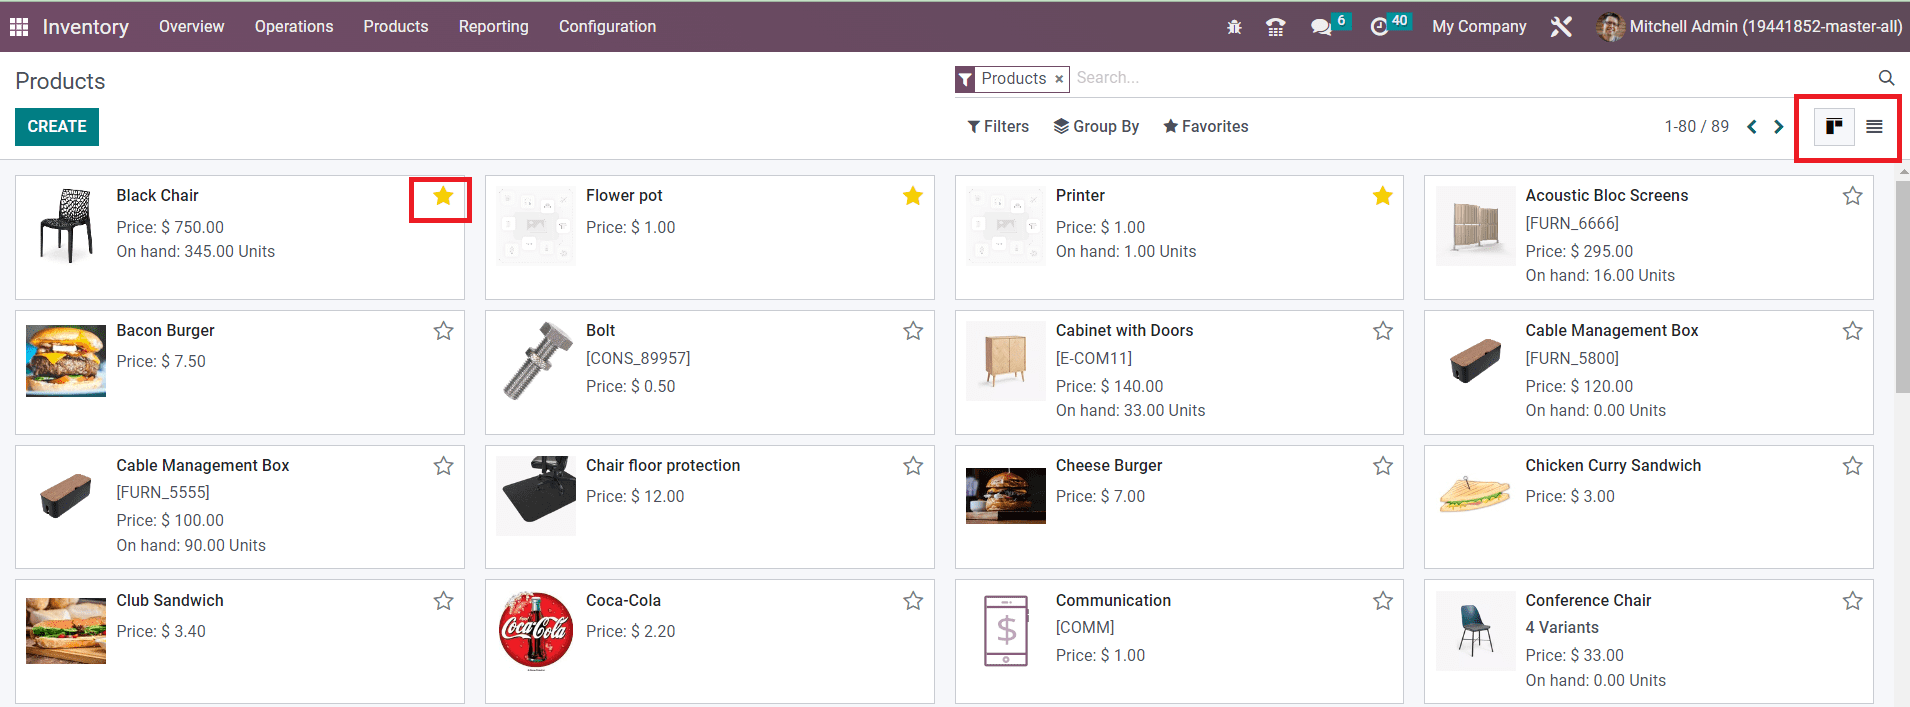
The image shown above is the Kanban view of the products platform. You will get the name of the products along with important information such as price, image, quantity on hand etc on each product tab. The star icon is used to add the products to your favorite list. This will help you to retrieve all your favorite products at a single click. As you know, Odoo provides advanced sorting options on almost all platforms. In this window also you will get the **Filters** and **Group By** options to save your time by easily locating required data related to the product described in the Inventory module.
The Filter option provides the default and custom features to locate the required data. You can filter Services, Products, Published, Available in PoS, Can be Sold, Can be Purchased, Can be Rented, Can be Subcontracted, Can be Expensed, Available Products, Negative Forecasted Quantity, Favorites, Warnings, and Archived products using the default options. Using the **Add Custom Filter** option, you can create new custom filters for the products.
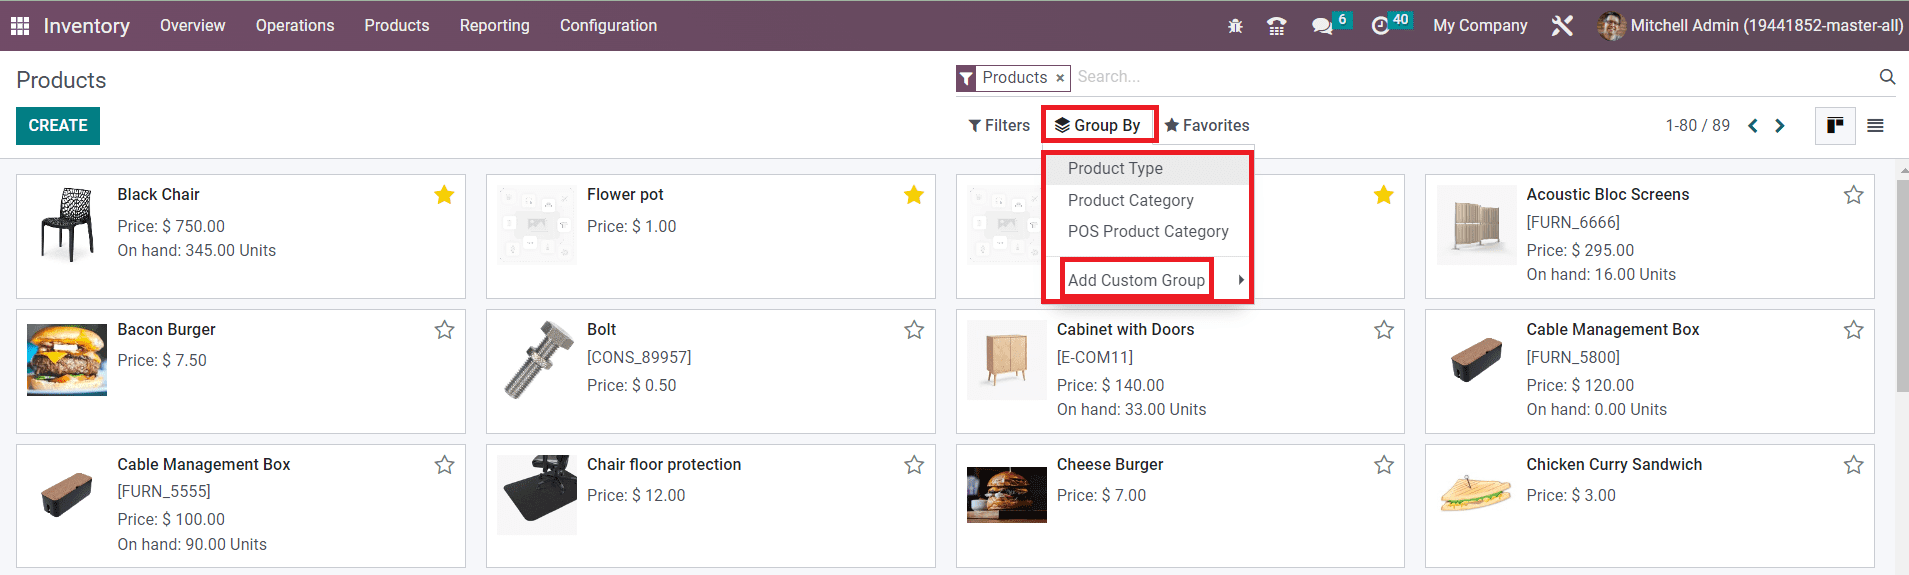
Similarly, you will get default and custom sorting options in the **Group By** feature also.
The default options allow you to group products based on the Product Type, Product Category, and POS Product Category. Use the **Add Custom Group** feature to create new grouping options according to your requirements.
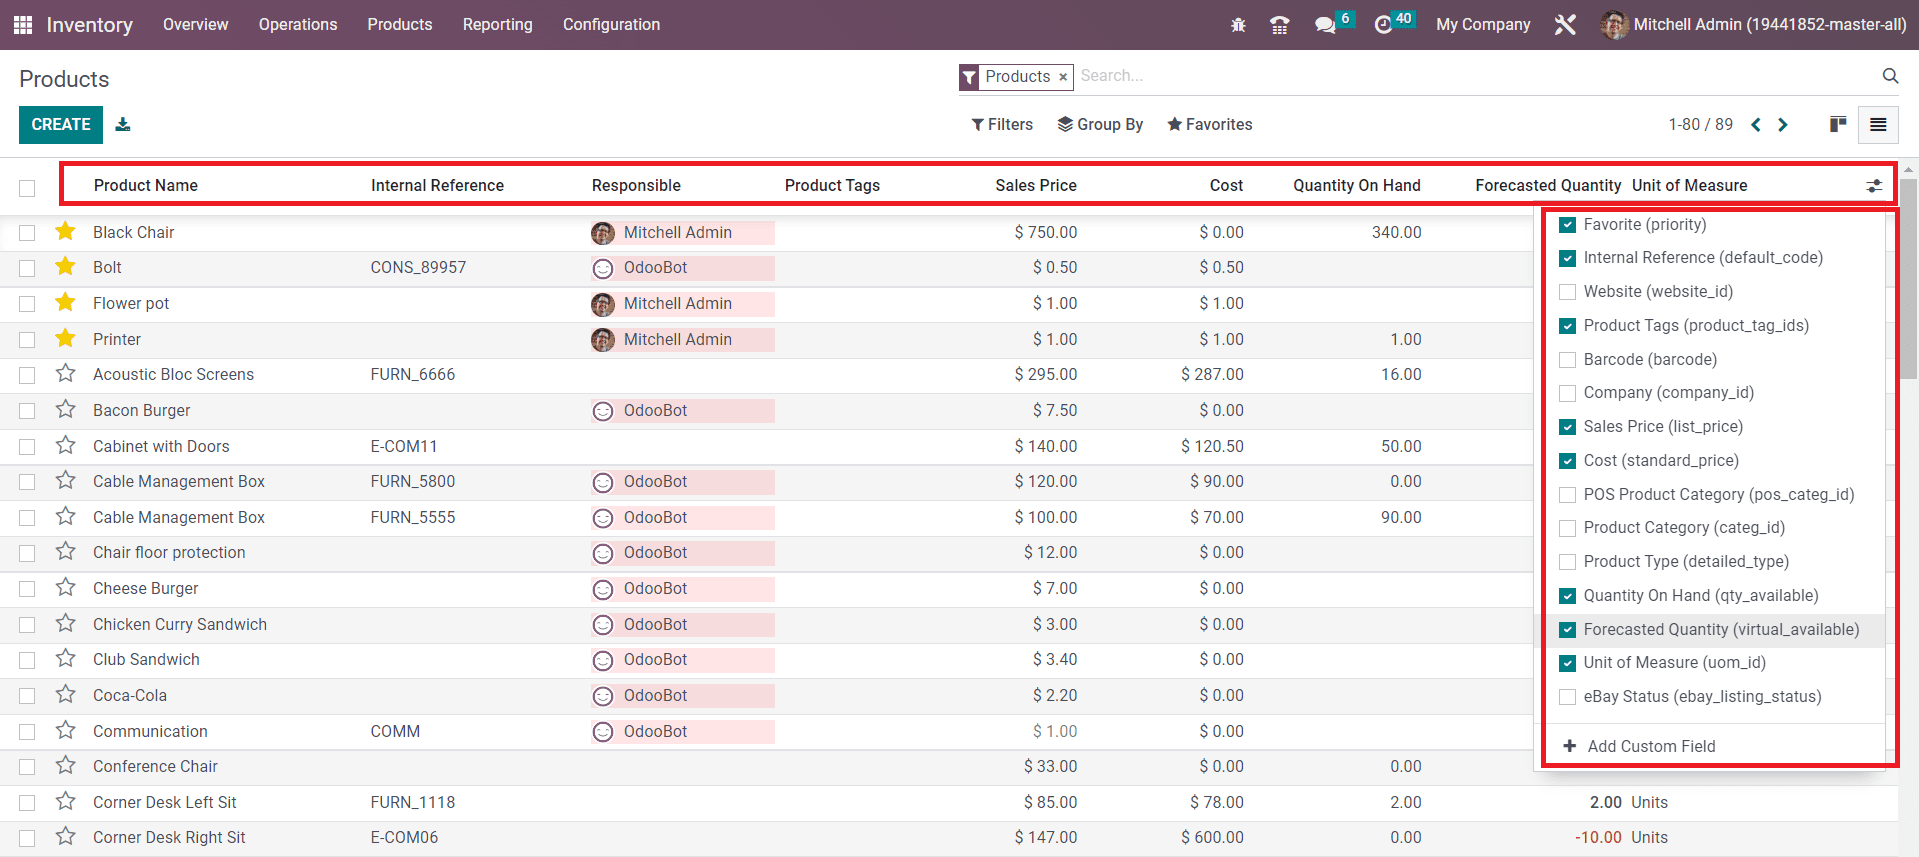
The list view will give you a preview of the products as shown below.
The preview includes the Product Name, Internal Reference, Responsible, Product Tags, Sales Price, Cost, Quantity On Hand, Forecasted Quantity, and Unit of Measure. You can expand the list view by adding additional fields to the list view from the default options such as the Website ID, Barcode, Company, POS Product Category, Product Category, Product Type, and eBay Status. The **Add Custom Field** option allows you to add customized fields to the list view.
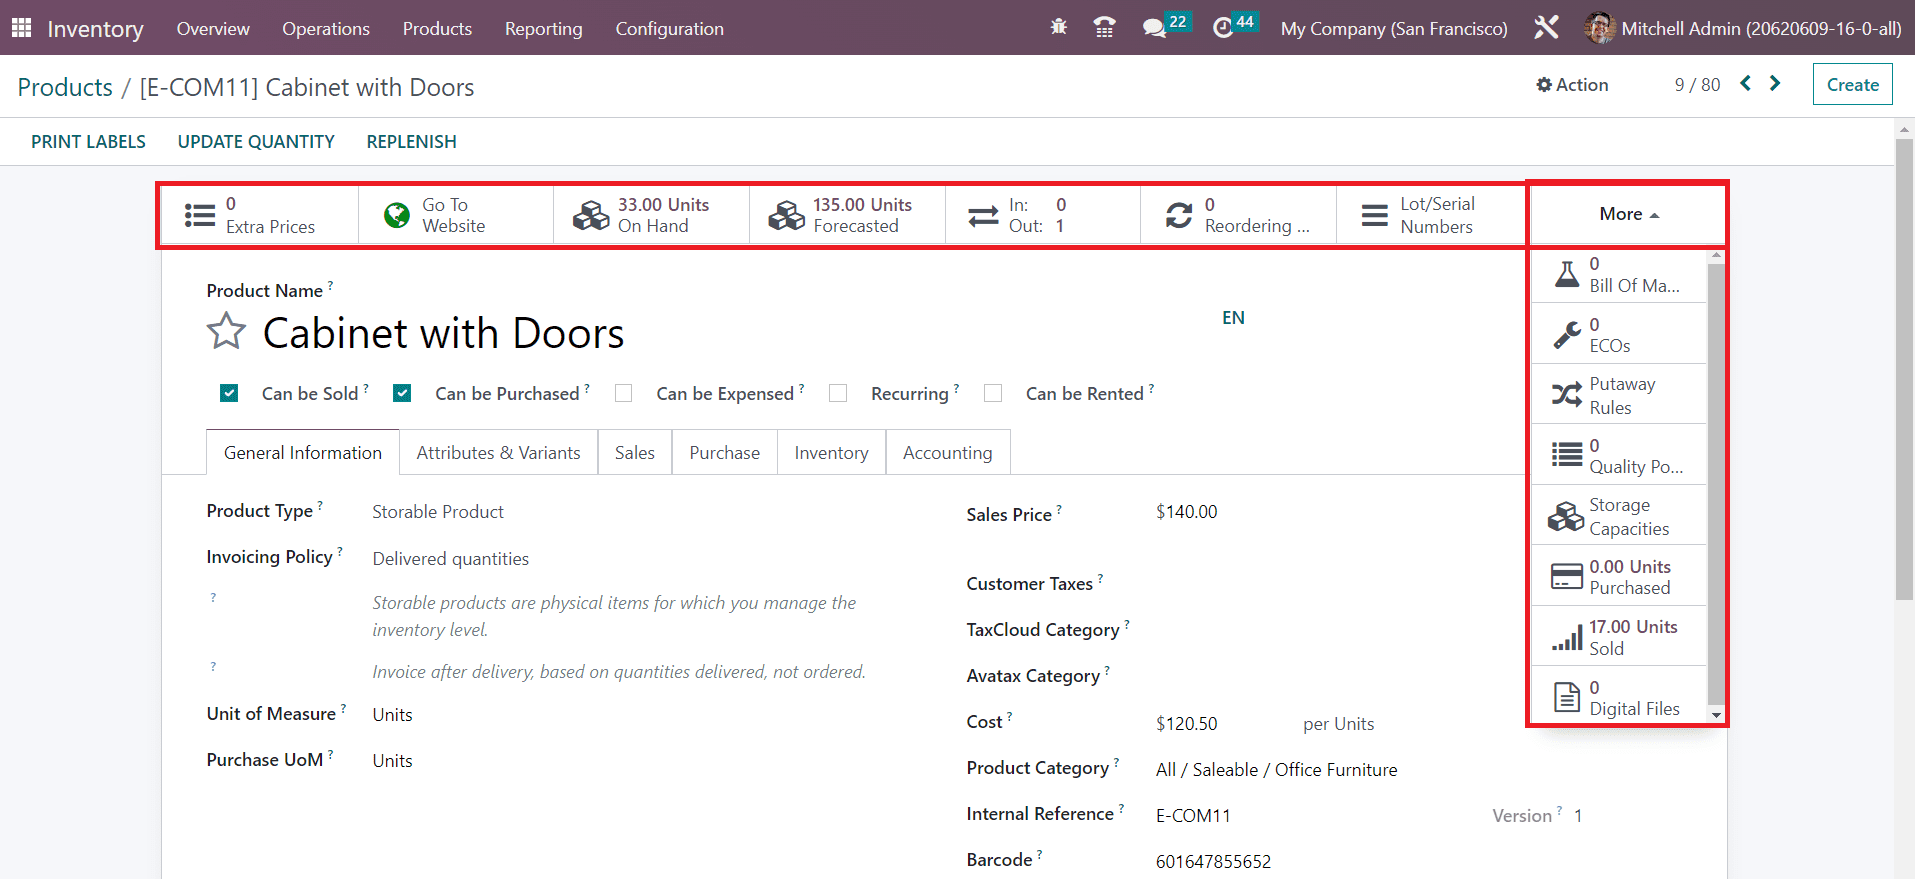
You can manage and edit the product details of any product by simply clicking on the required product from the list. The product details window can be observed as depicted below.
The user will get advanced smart buttons in the products window based on the data configured on the respective product. The **Extra Prices** button can be used to manage extra pricelists of the product. The product can be published and managed on eCommerce easily with the help of the **Go To Website** . The quantities available in the inventory will be shown in the **On Hand** button. Similarly, the details of the quantities forecasted will be available in the **Forecasted** button. The **In & Out** button will provide the movement history of the products in inventory. The Reordering Rules and Lots/Serial Numbers configured on this product can be obtained from the corresponding smart buttons. The **More** button will show additional options to obtain the details related to the Bill of Materials, Engineering Change Orders, Putaway Rules, Quality Control Points, Storage Capacities, Purchase Analysis, Sales Analysis, and Digital Attachments regarding the product.
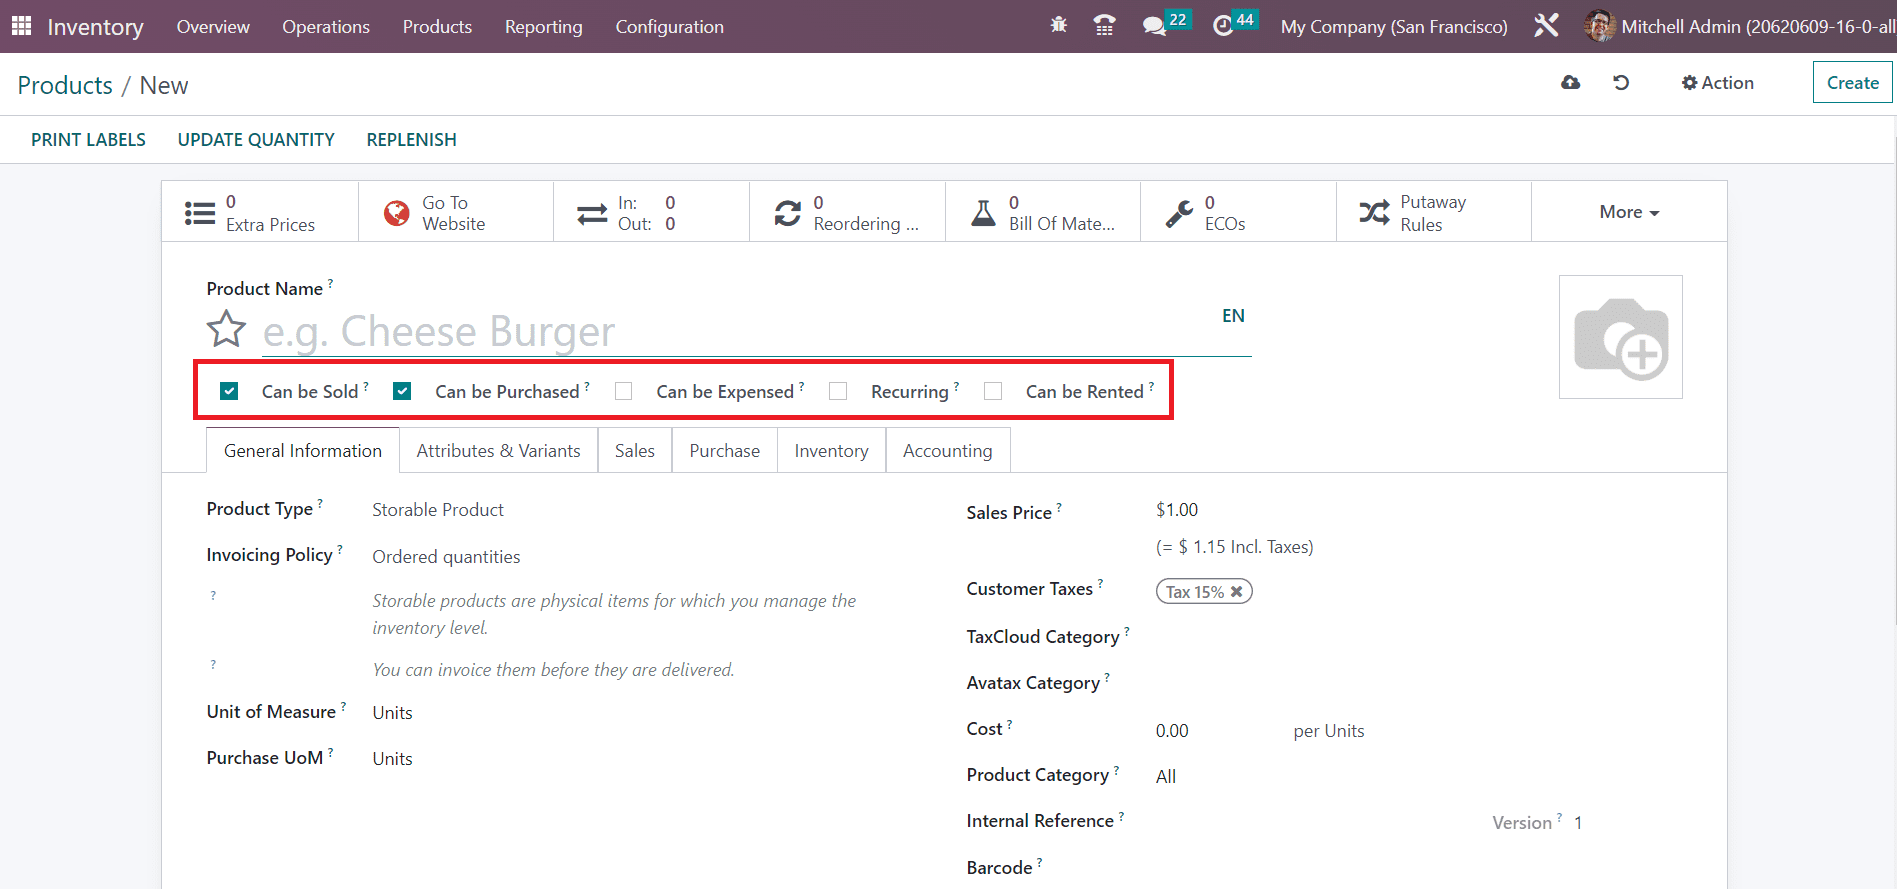
Now, let’s create a new product using the **Create** button and discuss the options available in the product configuration window. As soon as you click on the **Create** button from the product's dashboard, Odoo will lead you to the product configuration window as depicted below.
First, you can mention the name of the product in the **Product Name** field. If you want to add this new product to your favorite list, you are allowed to use the Star icon. You can add an attractive picture of the product in the given space.
While configuring a new product, you will be asked to select the operation types related to the product. The options are,
**Can be Sold:** Select this option for sales products.
**Can be Purchased:** Select this option for purchasable products.
**Can be Expensed:** Select this option if you want to select this product while creating expenses.
**Recurring:** Select this option to create a subscription while confirming sales orders with this product.
**Can be Rented:** Select this option to allow renting of this product.
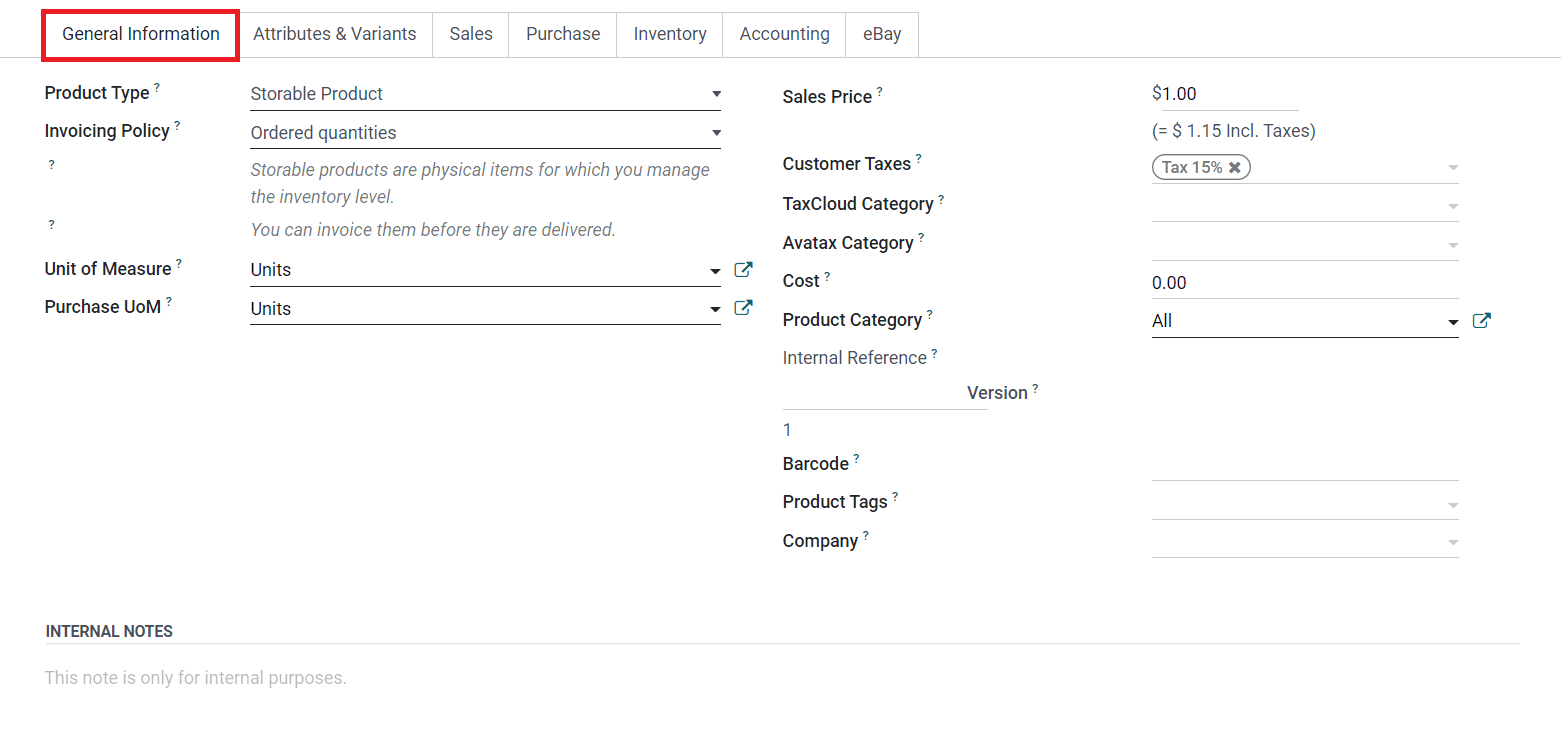
In order to add additional details concerning the product, we have the General Information, Attributes & Variants, Sales, Purchase, Inventory, Accounting, and eBay tabs. The General Information tab is given below.
Under this tab, you can define the **Product Type** from the given options. From the dropdown menu, you will get a list of the available product types.
**Consumable Products:** You don’t have to maintain inventory for this type of product because they are directly delivered from suppliers to the respective customers.
**Service:** Odoo considers all kinds of services offered by a company as Service products. The user can’t keep the inventory of this type of product. It is a non-material product offered by a company.
**Storable Product:** These are the types of products for which you have to manage stocks. The delivery of this product type is possible only after having sufficient stock in inventory. You can replenish the inventory using the reordering rules on the products. Otherwise, Odoo will generate warning messages while creating orders to inform the insufficient stock.
**Event Ticket:** The tickets of an event can be configured as a product in Odoo using this product type.
**Event Booth:** The booths offered by a company at the time of an event can be configured as products in Odoo by using the Event Booth product type.
**Course:** It is a non-material product offered by a company as a part of eLearning programs.
After mentioning the product type, you can set the **Invoicing Policy** . Odoo offers two types of Invoicing Policies for its users.
**Ordered Quantities:** Using this invoicing policy, you can generate invoices for the quantities ordered by a customer. This will allow you to invoice all the quantities mentioned in the order even before the delivery.
**Delivered Quantities:** This invoicing policy will consider the delivered quantities only to generate invoices. If a customer ordered 12 quantities of a product and only 5 are delivered, Odoo will generate the invoice for the delivered 5 quantities using this invoicing policy. The invoice for the remaining 7 quantities will be generated only after the delivery.
The default unit of measure used for all stock operations of this product can be mentioned in the **Unit of Measure** field. The **Purchase UoM** indicates the default unit of measure used for the purchase orders of this product. You can mention the price at which this product is sold to your customers in the **Sales Price** field. The default taxes applied on the products while setting them can be defined in the **Customer Taxes** field. The **TaxCloud Category** refers to taxability information codes that are used to compute specific tax rates for each product type. You can mention the **Avatax Category, Cost, Product Category,** current **Version** of the product, **Barcode, Product Tags,** and **Company** in the respective fields. The **Internal Notes** field can be used to specify the notes related to the product which are only for internal purposes.
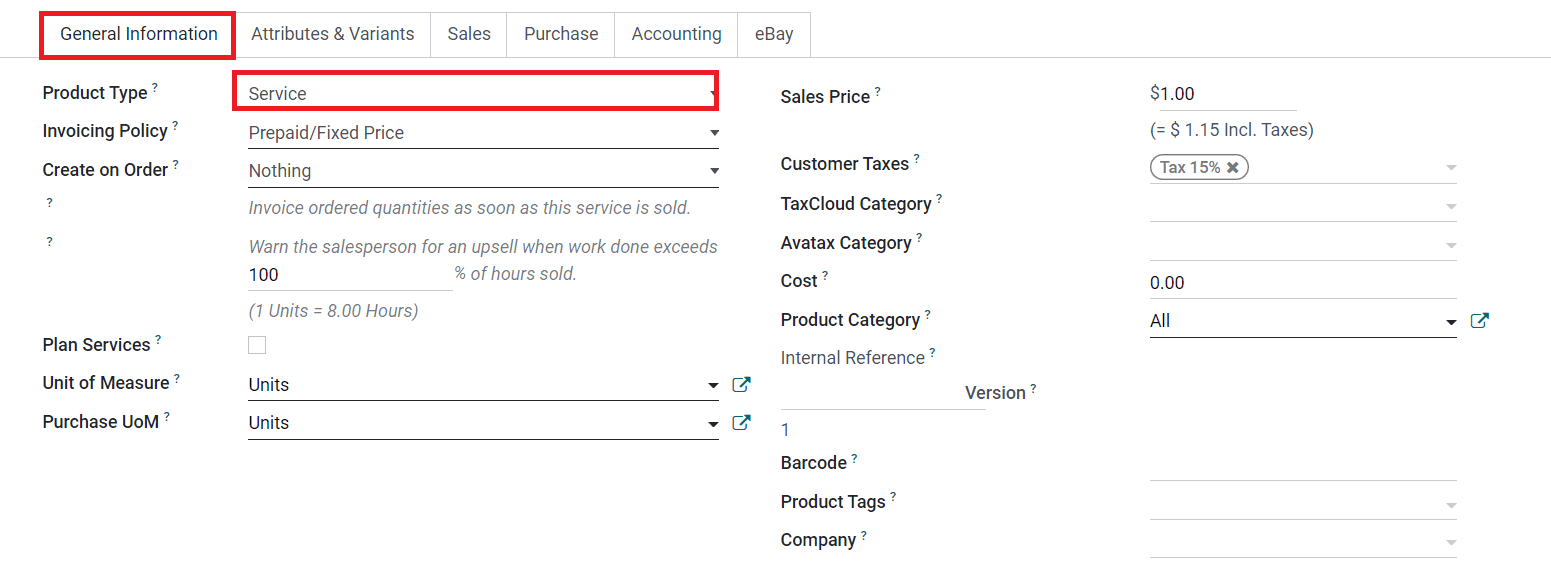
For **Service** type products which include Event Tickets, Event Booths, and Courses also, there will be some changes in the available fields.
Here, you will get four types of invoicing policies detailed below.
**Prepaid/Fixed:** Invoices can be created at any time based on the ordered quantities.
**Based on Timesheets:** Invoice tasks or projects based on timesheets of the delivered quantities.
**Based on Milestone:** Invoice tasks or projects based on completed milestones.
**Based on Delivered Quantity:** Invoice services based on delivered quantities.
You can select a suitable option in the **Create on Order** field. On sales confirmation, this product can generate a project, task, or project & task together based on the option you select. Using this project/task, you can track the service that you are selling. If the **Plan Services** option is selected, a shift will be automatically generated for the selected role when confirming the sales order. You can mention the role in the space that appears after activating the **Plan Services** .
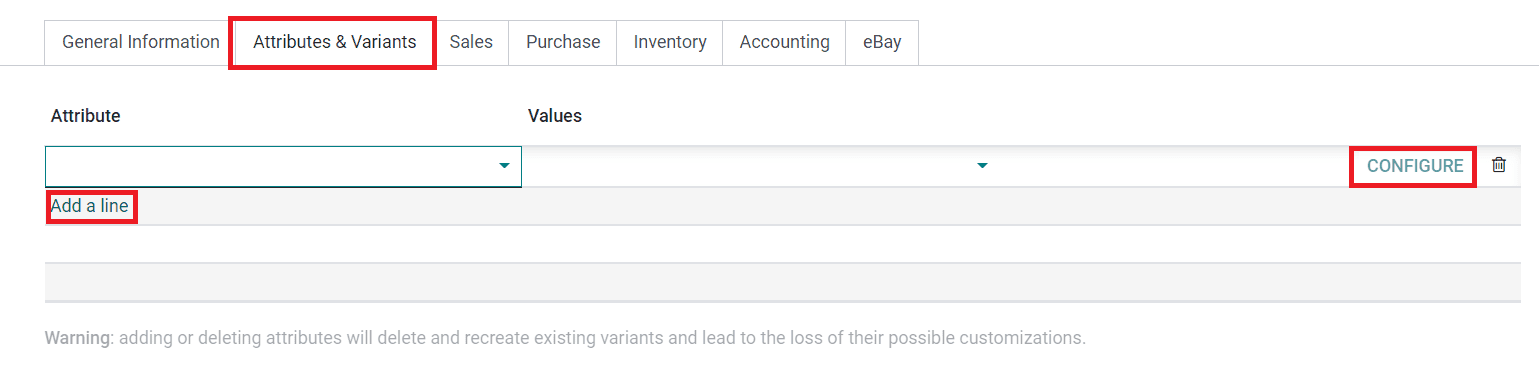
In Odoo, you can keep records of different variants and attributes of a product so that the customer will get multiple options to select from.
Using the **Add a Line** buttons under the **Attributes & Variants** tab, you can specify the varieties of a product that are already configured in Odoo. If you want to add a new variant or attribute, you can use the **Configure** option.
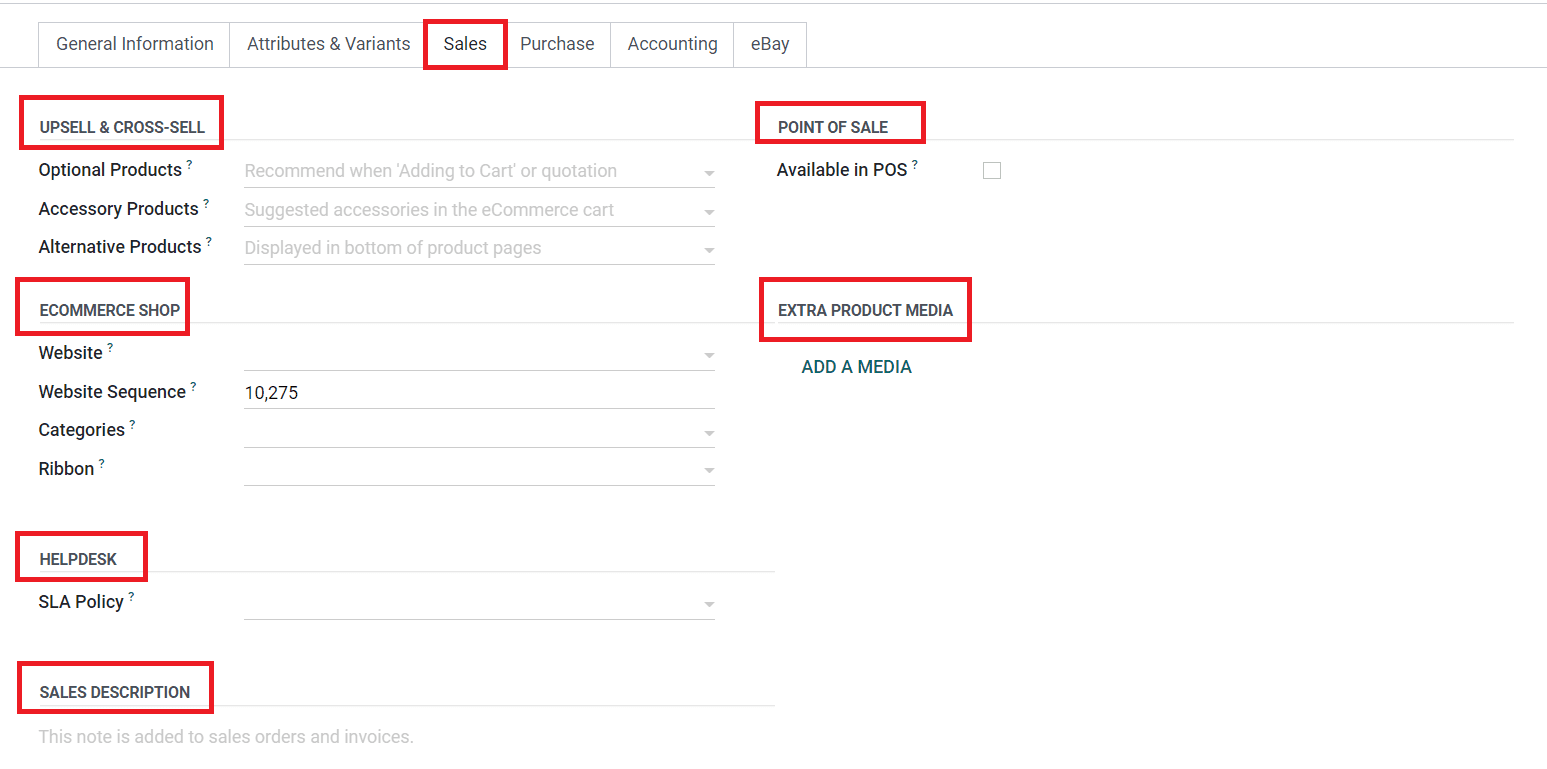
Under the **Sales** tab, you can define the Upsell & Cross-sell, Ecommerce Shop, Helpdesk, Point of Sale, Extra Product Media, and Sales Description.
Odoo offers different eCommerce strategies to improve sales online. As a part of this, you will get the option to define the upselling and cross-selling strategies in the **Sales** tab. The **Optional Products** are the products that are suggested to the customers whenever they click on the Add to Cart button. This is a part of the cross-selling strategy. Odoo will recommend related products that can be bought together with the main product using this feature. The **Accessory Products** are also a part of cross-selling strategy that suggest accessories to the customers whenever they review their cart before payment. **Alternative Products** will suggest alternatives to the product that you selected. This will be displayed at the bottom of the product page on the eCommerce website and it is considered as one of the best up-selling strategies to enhance online sales.
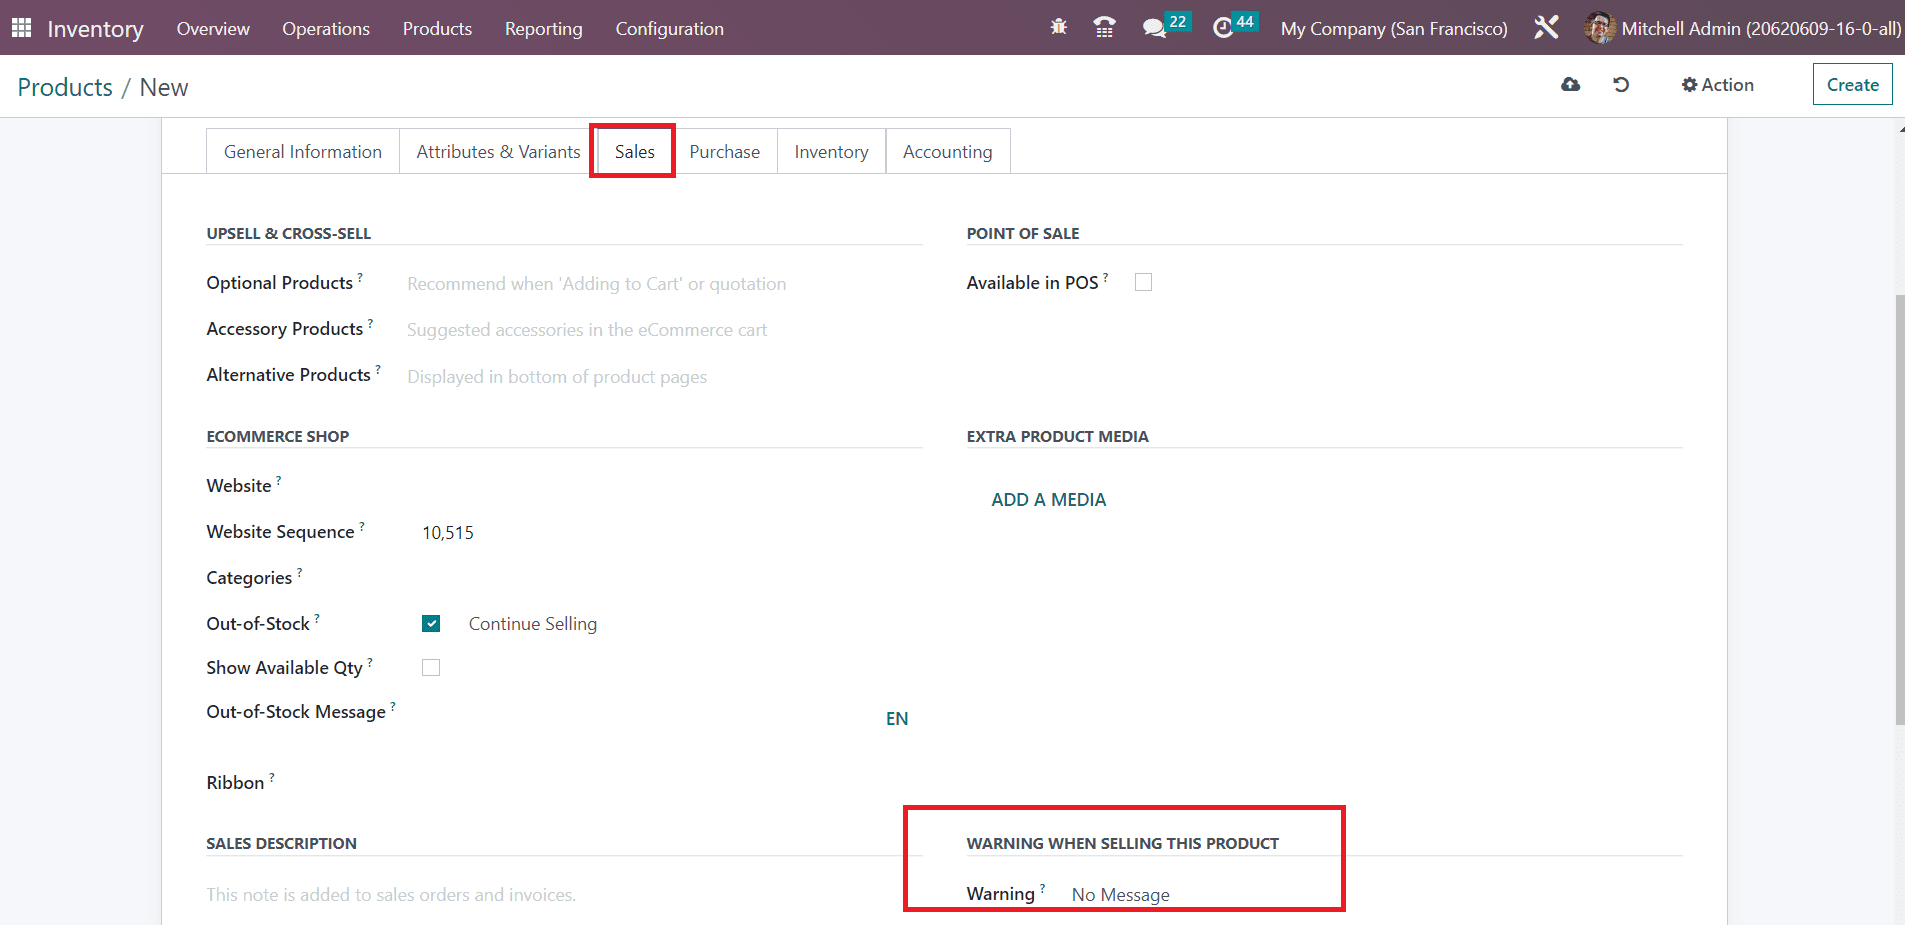
You can set warnings while selling this product in the **Warning** field under the **Sales** tab as shown in the image below.
You can make this product available in PoS by activating the corresponding option from the **Point of Sale** field. After activating this option, you will get the **To Weight with Scale** feature to enable. You can enable this feature if the product should be weighted using the hardware scale integration. Specify the category of the product used in the PoS in the **Category** field.
In the **Ecommerce Shop** field, you can specify the Website, Website Sequence, Categories, and Ribbons for the eCommerce display of the product. The **SLA Policy** used for the helpdesk tickets created for this product can be specified under the **Helpdesk** field. The Sales Description added in the Sales tab will be added to the sales orders and invoices of this product.
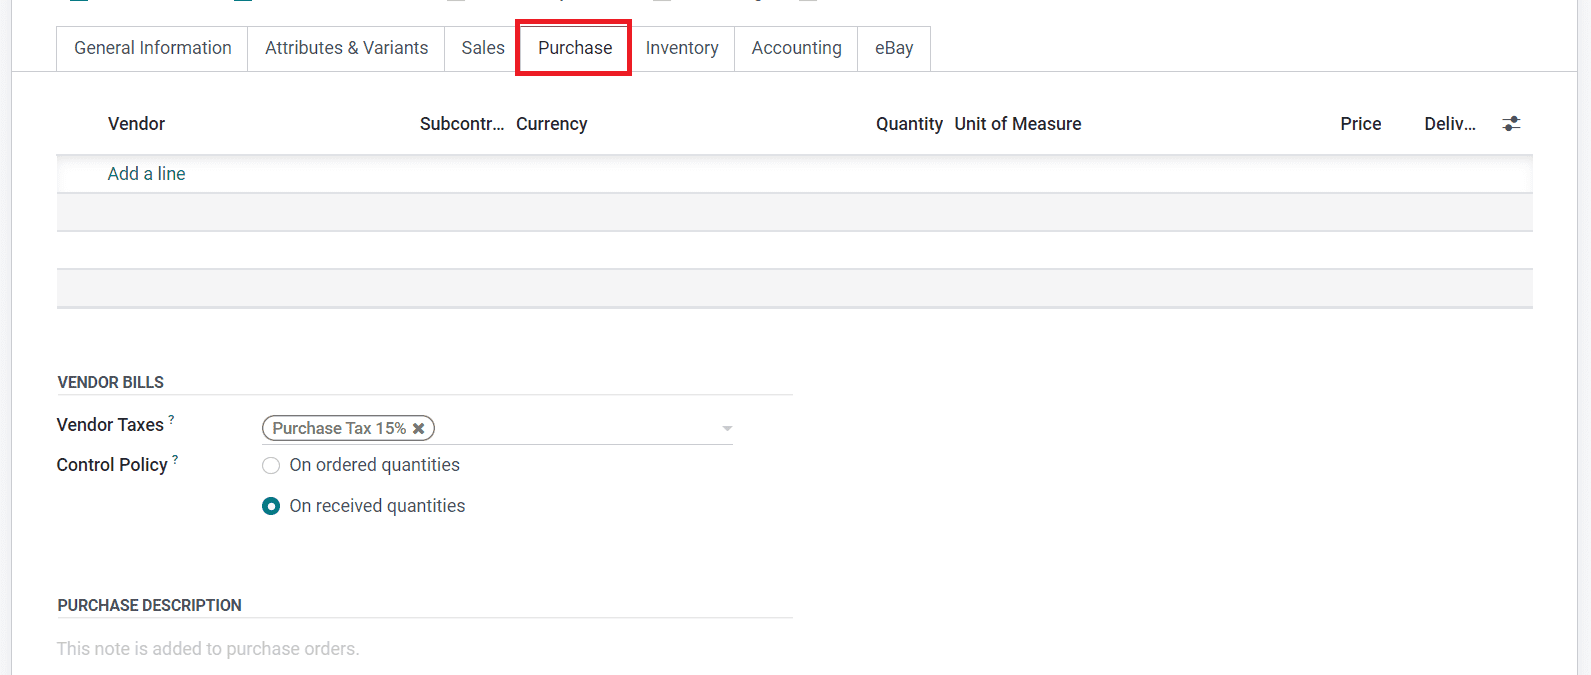
Details regarding the purchase of the product can be added under the **Purchase** tab. The list of vendors of this product can be mentioned using the **Add a Line** button. If you are intending to subcontract this product with the selected vendor, you can activate the **Subcontractor** field.
Specify the **Currency** suitable for the purchase operations with the vendor in the given space. Along with this, you can define the **Unit of Measure** used for the purchase orders with this vendor, the **Price** to purchase this product from the specified vendor, and **Delivery Lead Time** in the corresponding fields. The delivery lead time indicates the number of days between the confirmation of the purchase order with this vendor and the delivery of the product to its destination. Odoo allows you to configure multiple vendors to a single product which will help you to compare the prices and select the appropriate one for purchase.
Under the **Vendor Bills** section, you can set default **Vendor Taxes** used in the purchase operations of this product. The **Control Policy** will define how to generate vendor bills for the products. The bills can be generated based on the quantities ordered by the customer by setting the bill control policy on **Ordered Quantities.** If the customer wants to pay the bill only after receiving the products, you can set the control policy on **Received Quantities.** Use the **Purchase Description** tab to add internal notes related to the purchase operations of this product.
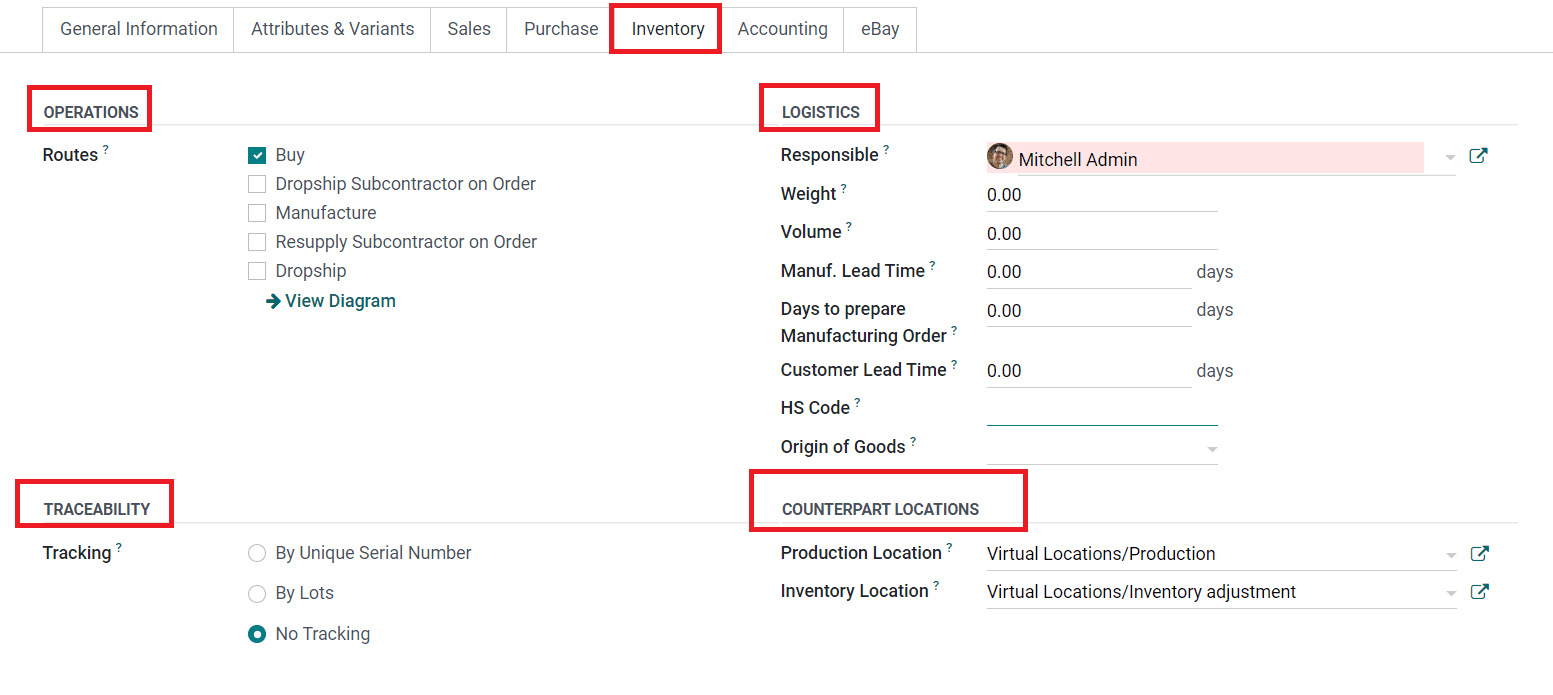
Now, let’s move on to the **Inventory** tab of the product configuration window. You can define the Operations, Logistics, Traceability, and Counterpart Locations in this tab.
According to the modules installed in your Odoo database, the **Operations** field will help you to define the **Routes** of the product. You can set the route of this product as Buy, Dropship Subcontractor on Order, Manufacture, Resupply Subcontractor on Order, and Dropship based on your company policies. Odoo offers tracking features for the storable products in your warehouses that will help you to locate the product in your inventory within seconds. You can track products using the unique serial number or lots configured on each product. In the **Traceability** field, you can set the **Tracking** based on Unique Serial Number or Lots. If you don’t want to allow tracking for this product, you can select the No Tracking option.
In the **Logistics** section, assign a **Responsible** employee who will be responsible for the upcoming activities related to the logistics operations of this product. The **Weight** and **Volume** of this product can be defined in the respective fields. The **Manufacture Lead Time** will define the average number of days required to manufacture this product. If this product is manufactured based on the multi-level Bill of Material, you can mention the manufacturing lead times of the components here. In the case of the subcontract, you can specify the date at which the components of the product will be sent to the subcontractor as the **Manufacture Lead Time.** In the Days to Prepare Manufacturing Order field, you can specify a particular number of days required to create and confirm manufacturing orders to ensure enough products in inventory. This will give you sufficient time to replenish components or manufacture semi-finished products. The **Customer Lead Time** is the number of days promised to the customer for delivery after confirming the sales order. Mention the **HS Code** in the given field which is used for international shipping and goods declaration. Additionally, you can specify the **Origin of Goods** from where they have been produced or manufactured.
Under the **Counterpart Locations,** you can specify the **Product Location** which is used as the source location for stock moves generated by manufacturing orders. The specified **Inventory Location** will be considered as the source location for the stock moves generated when you do an inventory.
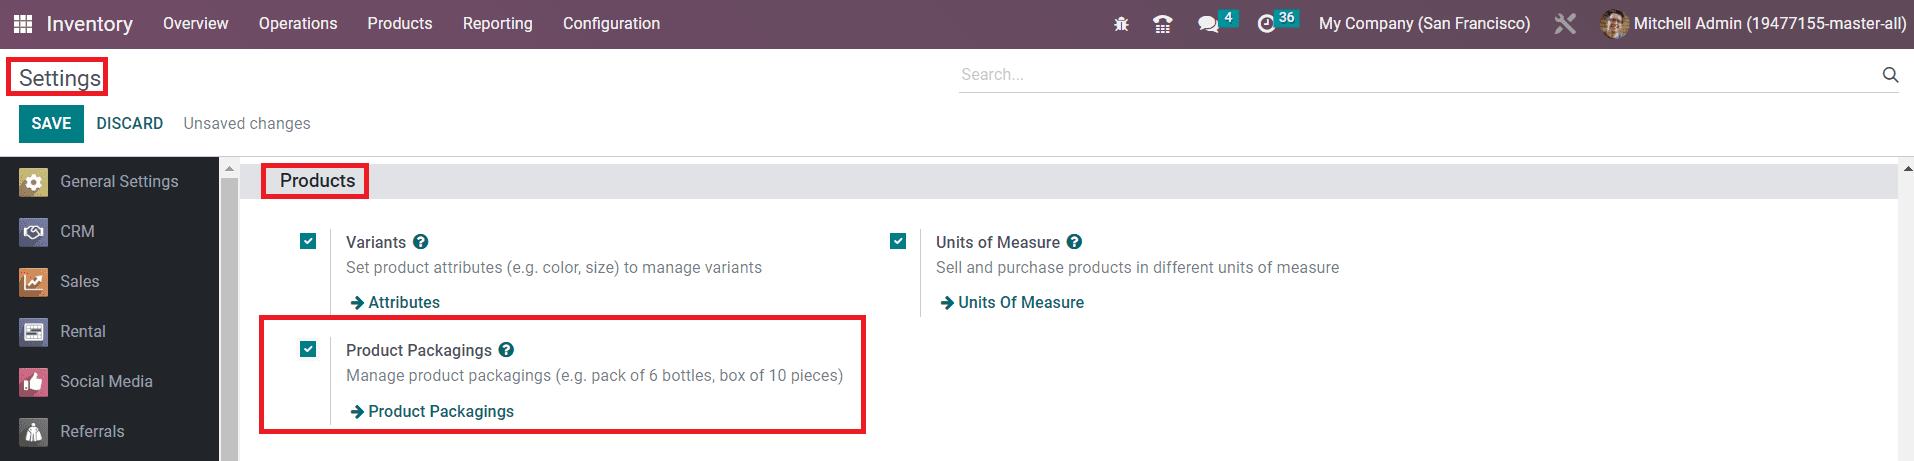
Under the **Inventory** tab, you will get an additional field to specify the packaging of the products in inventory. In order to get this option, you need to activate the **Product Packaging** feature from the Settings menu of the module as shown below.
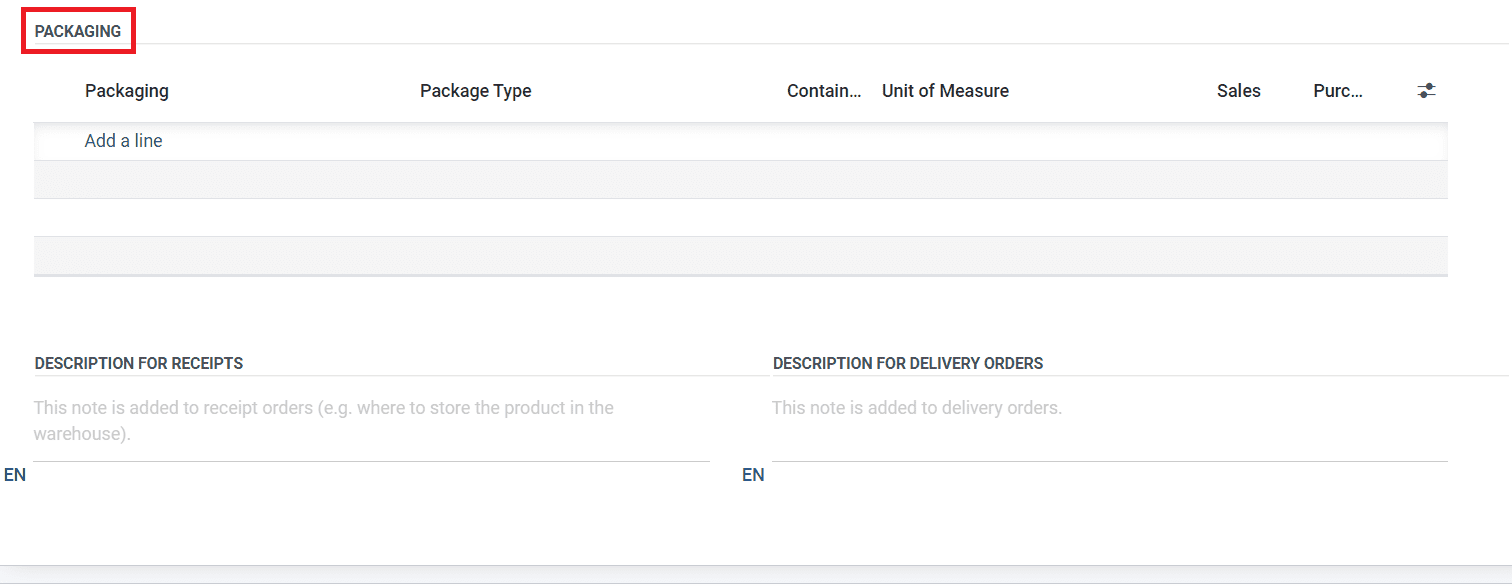
Once you activate this feature, the product packaging feature will be available under the Inventory tab of the product configuration window as depicted in the image below.
Using the **Add a Line** button, you can specify the Packaging, Package Type, quantity of the product contained in the packaging, and Unit of Measures. If you want to use this package method in the Sales and Purchase orders, you can select the respective fields. The **Description for Receipts** and **Description for Delivery Orders** can be used to add additional notes for receipts and delivery orders respectively.
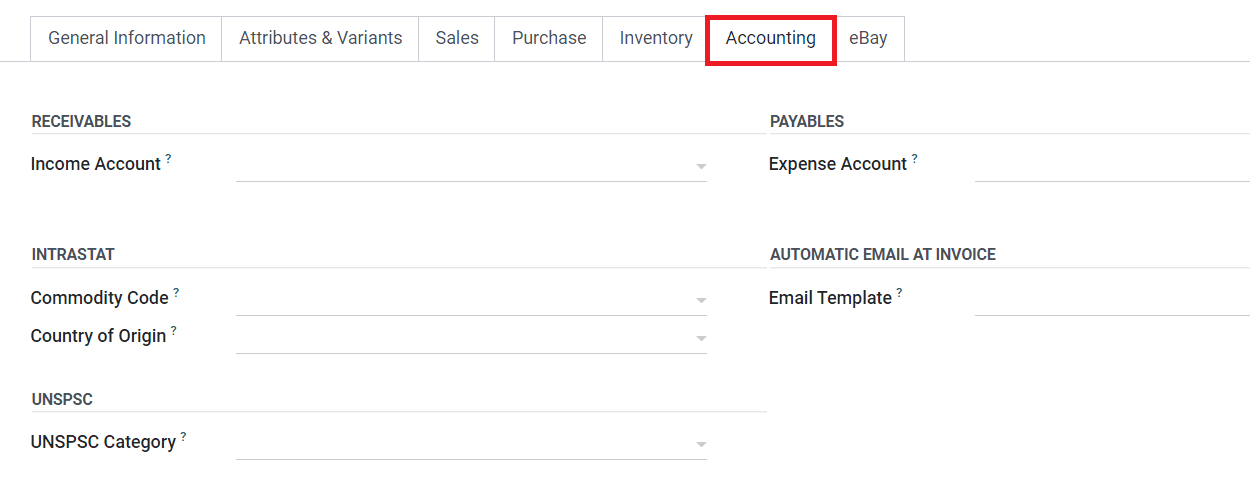
In the Product Configuration window, you will get the **Accounting** tab to specify the necessary details required for the accounting operations of the product.
Here, you can specify the **Income Account** in the **Receivables** field and **Expense Account** in the **Payables** field. In the **Intrastat** field, specify the **Commodity Code** and **Country of Origin** . By mentioning an **Email Template** in the **Automatic Email At Invoice** field, Odoo will automatically send a product-specific email once the invoice is validated. The **UNSPSC Category** used in the countries such as Columbia, Peru, and Mexico can be noted in the **UNSPSC** field.
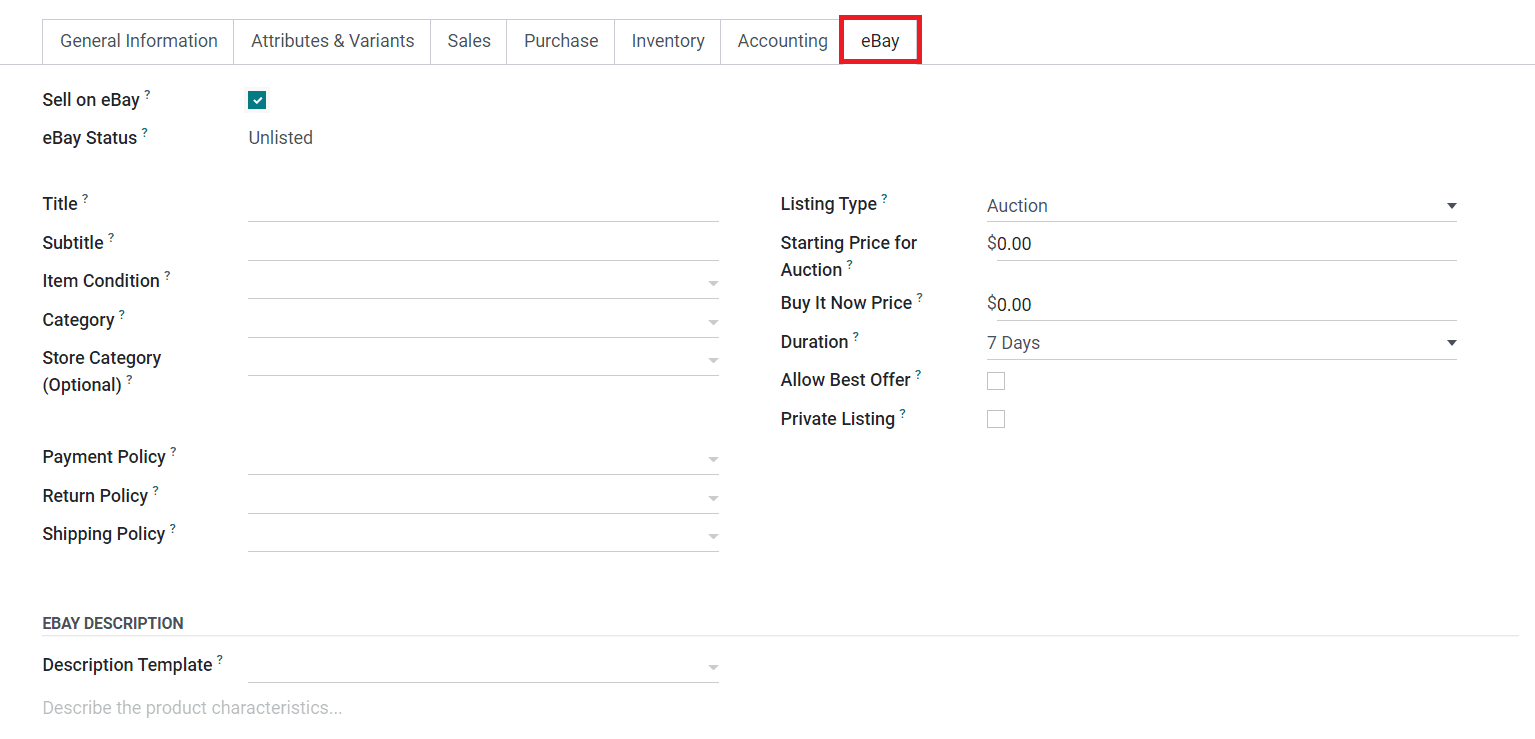
Under the **eBay** tab, you will get the **Sell on eBay** option to activate inorder to sell this product on eBay.
As soon as you activate the eBay option, you will get additional fields to define as shown in the image above. The eBay Status of the product can be observed here. You can add a suitable **Title, Subtitle, Item Condition, Category,** and **Store Category** for the product on eBay in the respective fields. The **Listing Type** can be set as Auction or Fixed Price. Based on the option you select, you will get an additional field to define the price. The eBay listing duration can be specified in the **Duration** field. Activating the **Allow Best Offer** will allow you to provide the best offers on eBay. The **Private Listing** option can be enabled to allow private listing for this product on eBay.
We detailed all available tabs in the product configuration window.
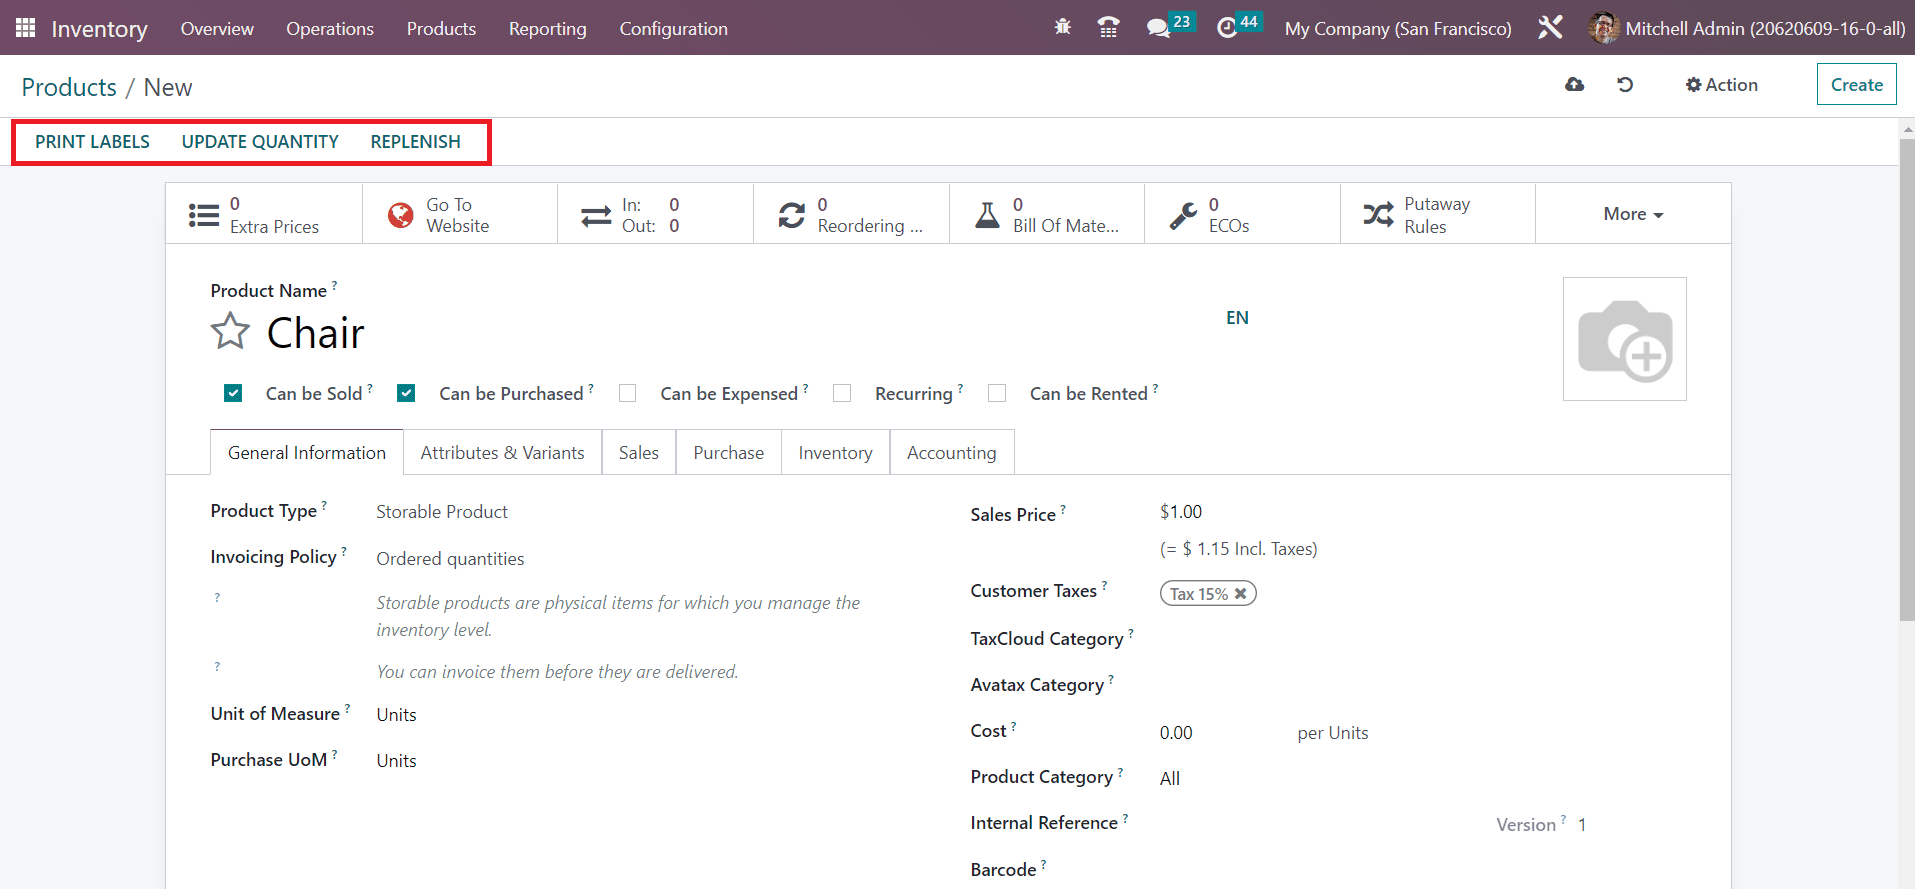
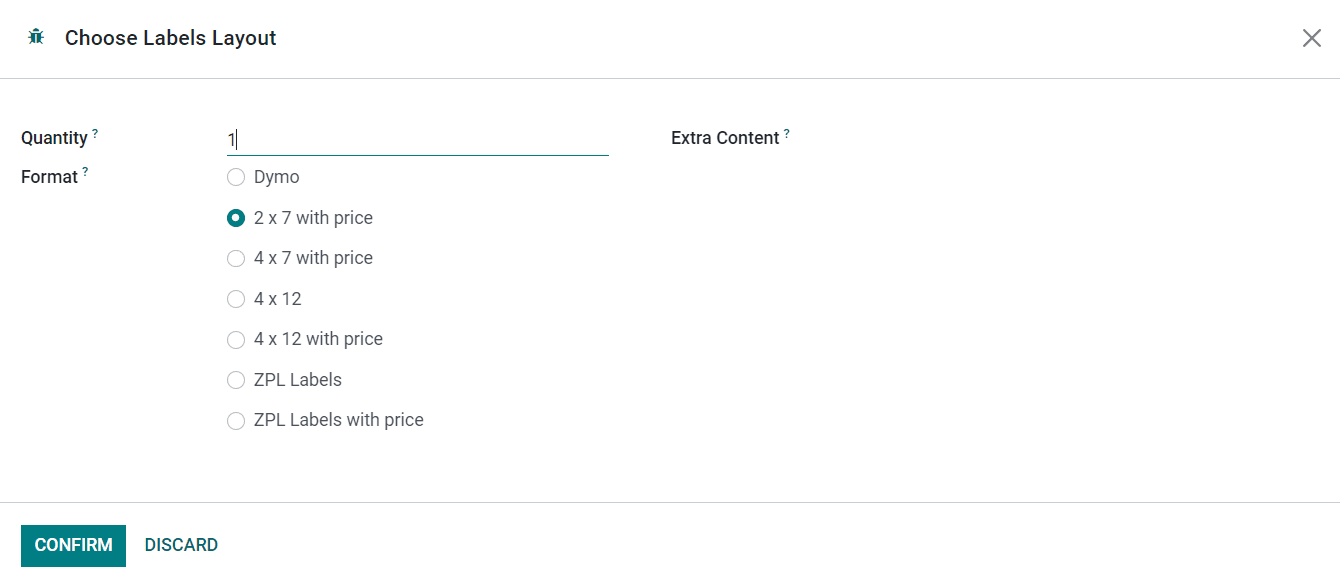
After adding a new product to your Inventory module, you will be able to get some operations tools on the screen such as Print Labels, Update Quantity, and Replenish. If you want to print labels for this product that can be used on the packages at the time of delivery, use the **Print Label** button. This will lead you to a new wizard as shown below.
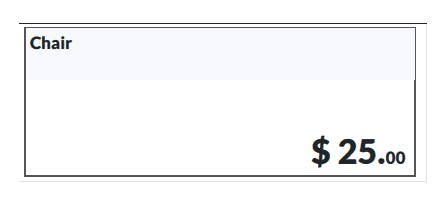
Here, you can specify the Quantity of the product, Extra Content, and Format of the label in the given fields. Clicking on the **Confirm** button will print labels for the selected product. An example is shown below.
So far we were discussing the product configuration feature, now let’s move to the configuration of product variants in the Inventory module.
---
# Agent Instructions
This documentation is published with GitBook. GitBook is the documentation platform designed so that both humans and AI agents can read, navigate, and reason over technical content effectively. Learn more at gitbook.com.
## Querying This Documentation
If you need additional information that is not directly available in this page, you can query the documentation dynamically by asking a question.
Perform an HTTP GET request on the current page URL with the `ask` query parameter:
```
GET https://docs.wafra.sa/inventory/product-managemnet.md?ask=
```
The question should be specific, self-contained, and written in natural language.
The response will contain a direct answer to the question and relevant excerpts and sources from the documentation.
Use this mechanism when the answer is not explicitly present in the current page, you need clarification or additional context, or you want to retrieve related documentation sections.