Customers
Customers
You will get a separate platform in the Odoo Sales module to create and manage the records of the customers of your company. Under the Orders menu, you can find the Customers platform as shown below. The window depicted below is shown in Kanban view which can be converted to a list view also based on your requirements. The customizable Filters and Group By options will assist you in easily locating required data from the record of the customers maintained in your database.
Using the small clock icon given on the right corner of each customer profile, you can effortlessly schedule various activities with them. Additionally, you can find some new updates in the kanban view of the customer window. On each customer profile, you can find the number of scheduled activities, added to favorites, purchases, and sales done by each customer. Click on these icons will directly lead you to the corresponding window where you can easily manage them.
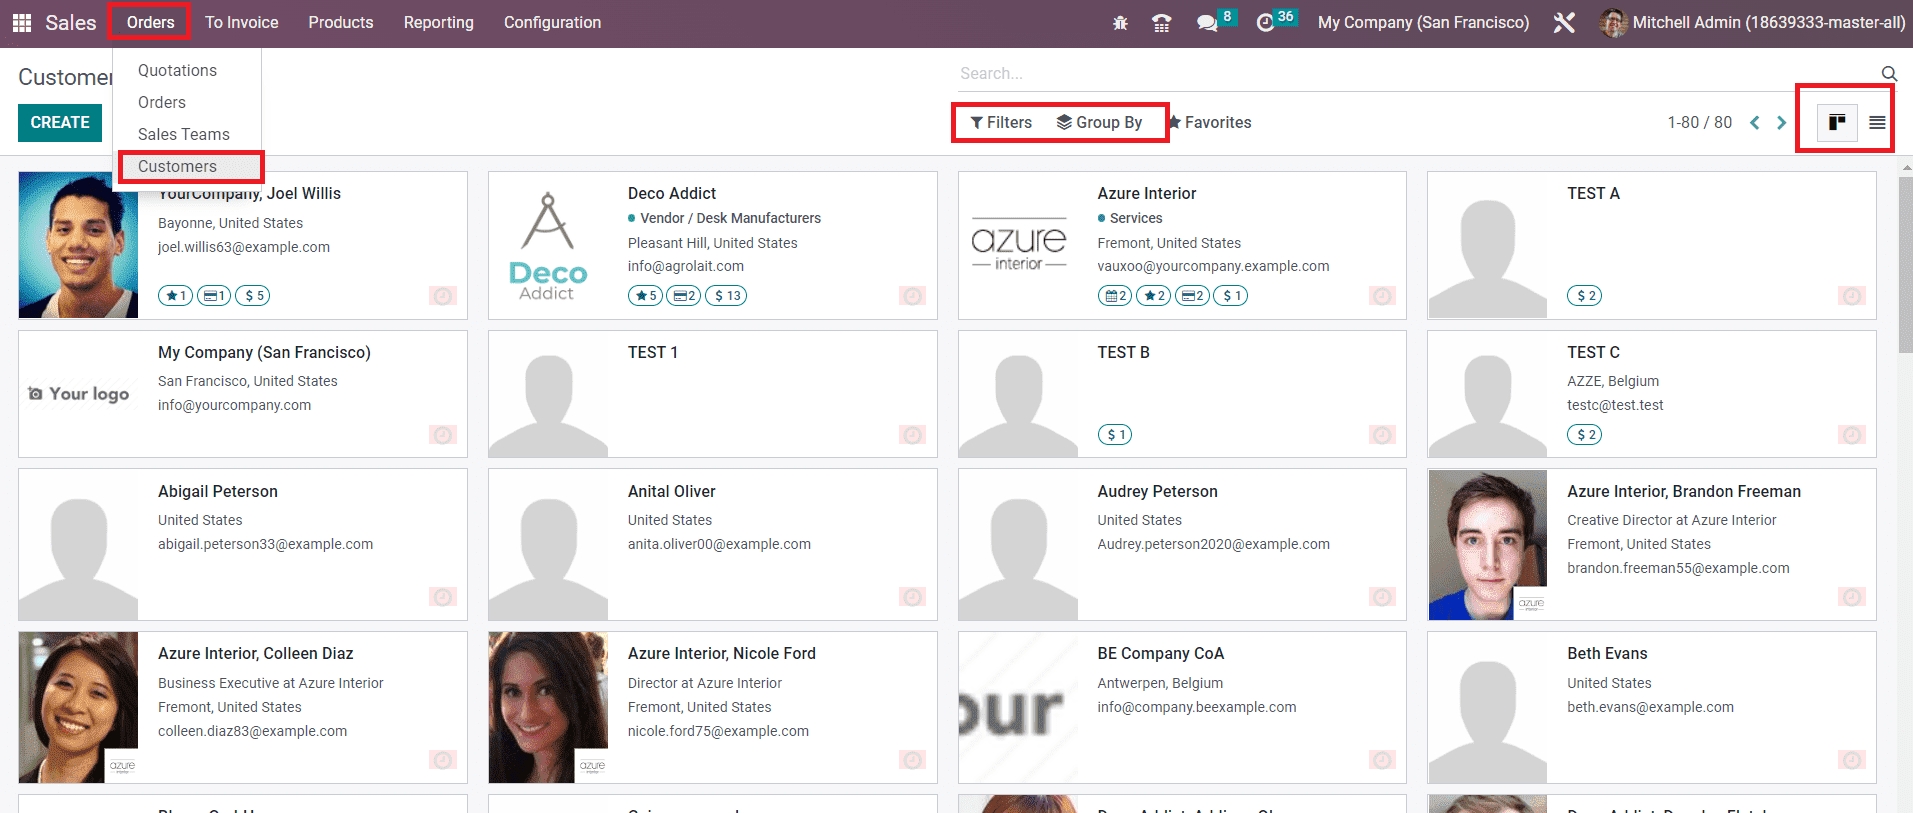
Now, you can configure a new customer with the help of the Create button.
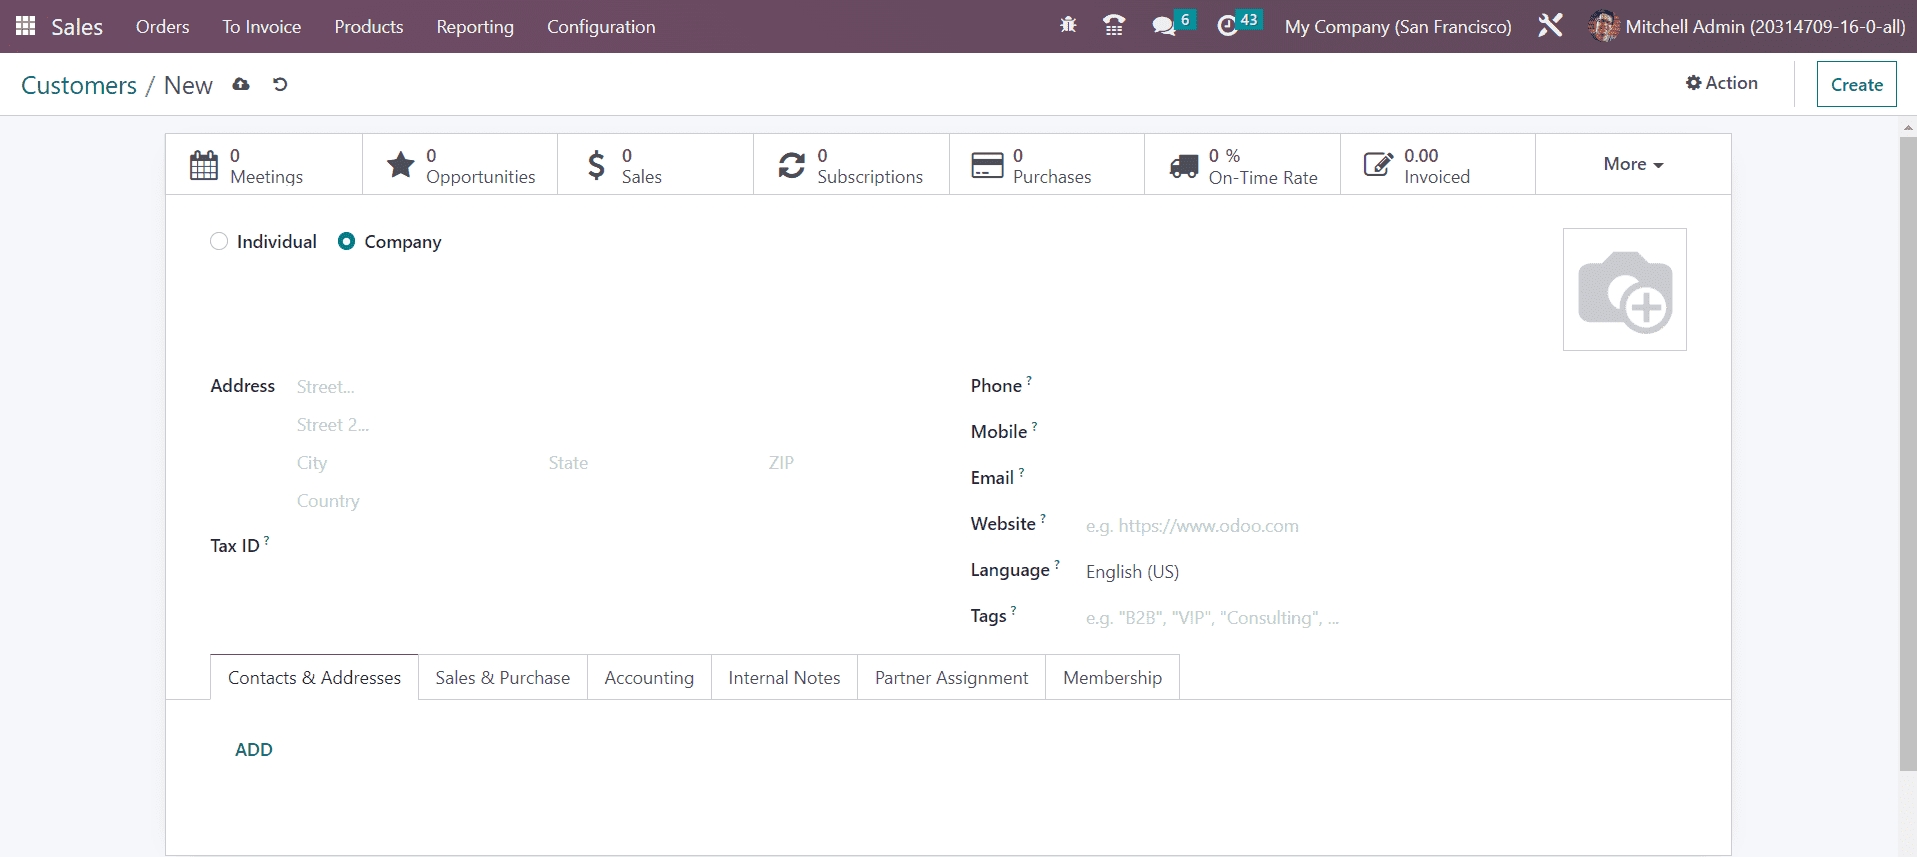
You can configure a new customer profile in the name of an individual or company. The name of the customer can be mentioned in the given space. Then, you can configure the necessary details regarding the customer such as Address, Tax ID, Phone, Mobile, Email, Website, Language, and Tags.
Under the Contacts and Addresses tab, you can add the contact details/ delivery adresss of the customer using the Add button.
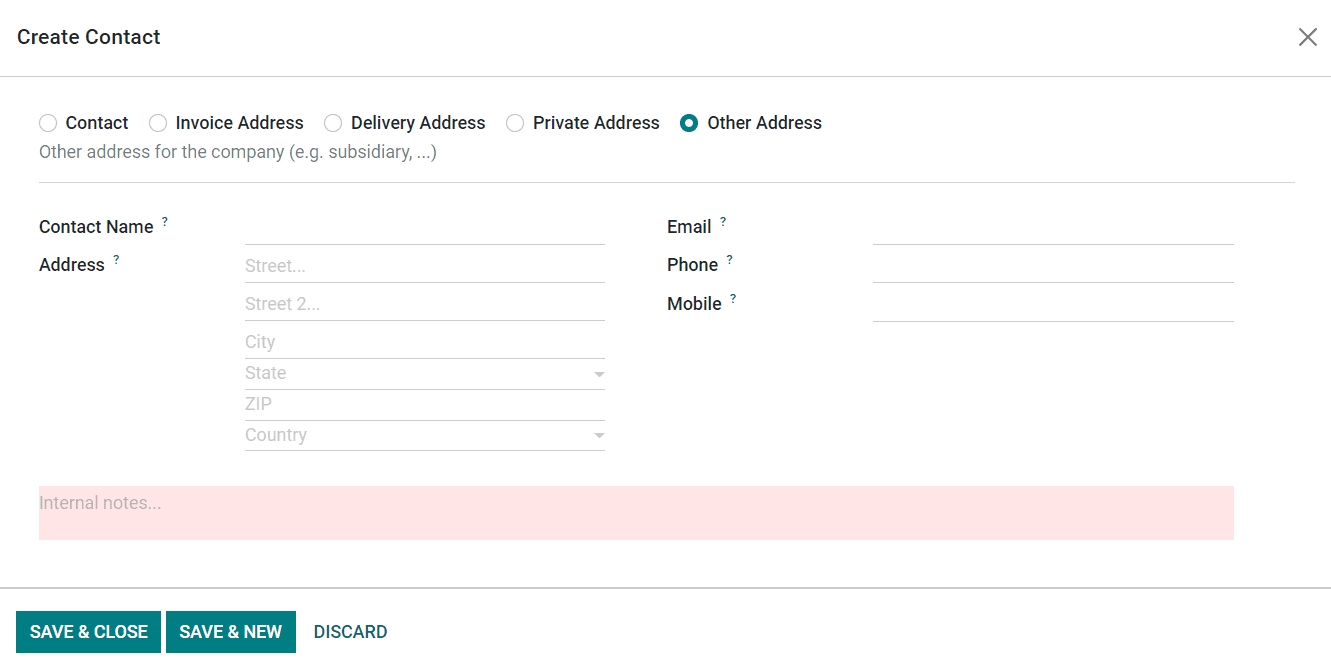
How to add delivery address as a google plus code.
Choose the right customer

Under contact and address click on the "add" button

Select Delivery address from the check box

Fill the contact name that who is going to receive/responsible for sign in delivery receipt.

fill email of the client

fill phone number

fill the mobile

fill the street address with all the necessary information

In this Google plus code you have to copy and paste the client delivery location from google.

select the delivery location first and copy the google plus code from the google map and paste the code inside odoo.

copy the code

paste the code in the same field and click save and close

After saving the contact, Save the parent contact as well.

You can mention the contact details as Invoice Address, Delivery Address, Private Address, or Other Address based on the option you select. After selecting the suitable option, you can specify the Contact Name, Address, Email, Phone, and Mobile in the respective fields.
The details required for the sales and purchase-related operations with the customer can be defined under the Sales and Purchase tab.
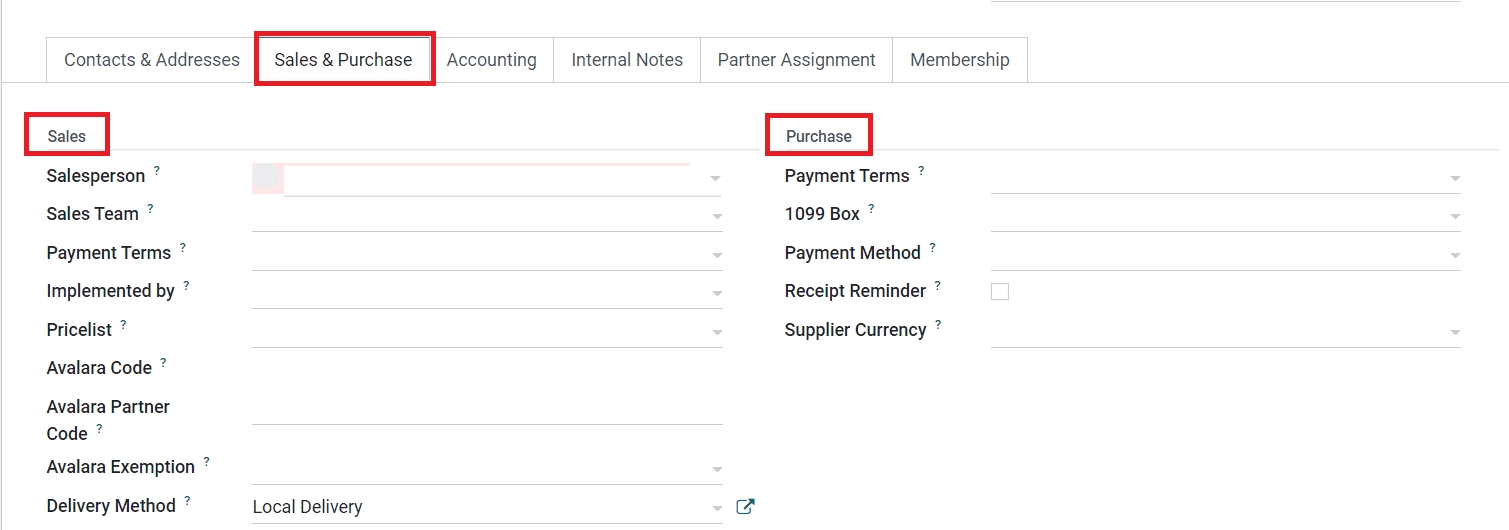
Under the Sales tab, you can assign a Salesperson and Sales Team in the respective fields to manage the sales operations related to this customer. By mentioning Payment Terms, this payment term will be used instead of the default one for sales orders and customer invoices. You can mention the assigned partner id in the Implemented By field. You can define a specific Pricelist for this customer in the specified field which will be used for sales instead of the default one. The customer will get an Avalara Code which can be used to cross-reference in the Avalara port. Mention the Avalara Partner Code and Avalara Exemption in the respective fields. The default delivery method to use in the sales orders of this customer can be specified in the Delivery Method field.
Under the Purchase tab, you can mention the suitable Payment Terms for the customer which will be used for purchase orders and vendor bills instead of the default one. Mention 1099 Box and the journal items of this vendor will be summed in the selected box of the 1099 report. In the Payment Method field, you can mention the preferred payment method when paying this customer. This is used to filter vendor bills by preferred payment method to register payments in mass. By activating the Receipt Reminder, Odoo will automatically send a confirmation mail to the customer particular days before the expected receipts date, asking the customer to confirm the exact date. The currency mentioned in the Supplier Currency field will be used for purchases from the current partner.

You can set a Barcode for the customer to identify them in Point of Sale. The Fiscal Position of the customer can be defined under the Fiscal Information field. The fiscal position determines the taxes/accounts used for this contact. Under the Miscellaneous tab, you can specify the Company ID, Reference, Company, Website, Website Tags, Industry, and SLA Policies in the corresponding fields.
In the Inventory field, you can specify the Customer Location in the given space. This stock location is used as a destination when sending goods to this contact. The stock location which is used as a source when receiving goods from this contact can be specified in the Vendor Location. In the Subcontractor Location field, you can mention a stock location that is used as a source and destination when sending goods to this contact during a subcontracting process.
The accounting details regarding the customer can be defined under the Accounting tab.
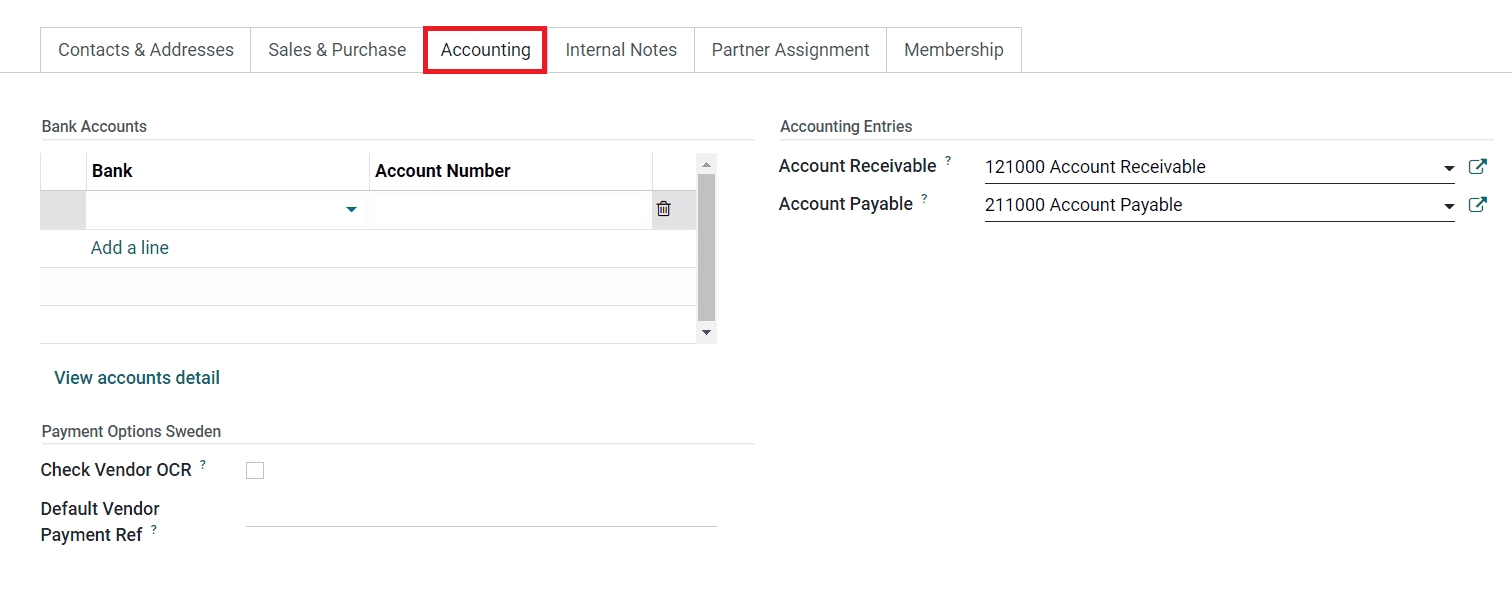
Using the Add a Line button, you can mention the Bank Accounts of the customer one by one along with the Account Number. After adding bank accounts, you can use the View Accounts Details button to get a better view of accounts. The Account Receivable and Account Payable can be specified under the Accounting Entries field.
If the customer uses the OCR number on their vendor bills, you can activate the Vendor OCR. If the Default Vendor Payment Reference is set, the customer uses the same default vendor payment reference or OCR number on all their vendor bills.
The Internal Notes tab can be used to add additional notes regarding the customer.

If you want to generate warning messages for the operations done between this customer, you can activate the Sales Warning feature from the Settings menu of the Sales module.
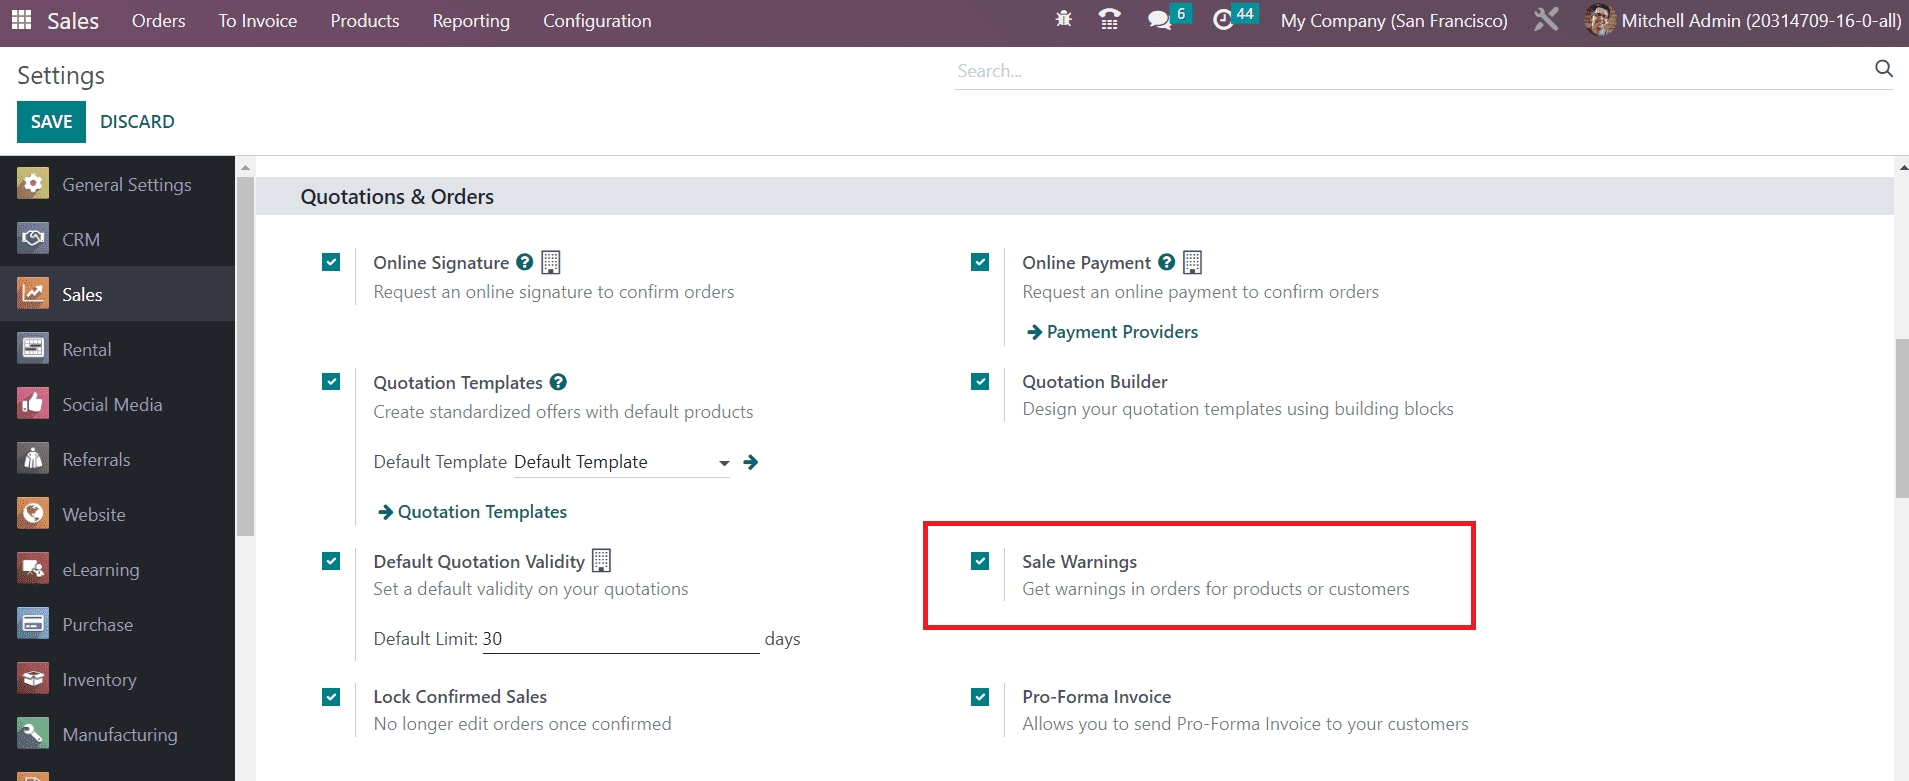
This feature will help you to get warnings in orders for customers. After activating this feature, you can check the Internal Notes tab in the Customer configuration window.
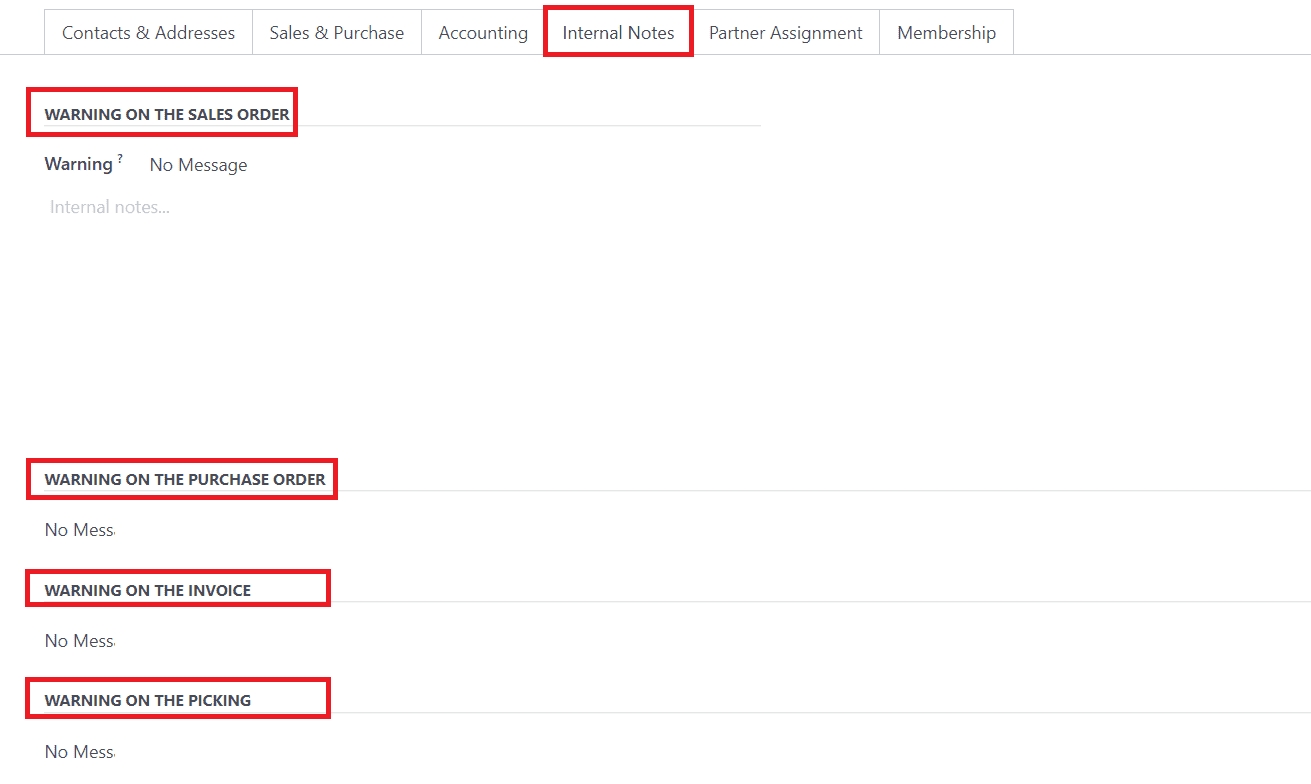
As highlighted in the image above, you can generate warnings on the sales orders, purchase orders, invoices, and picking for this customer.
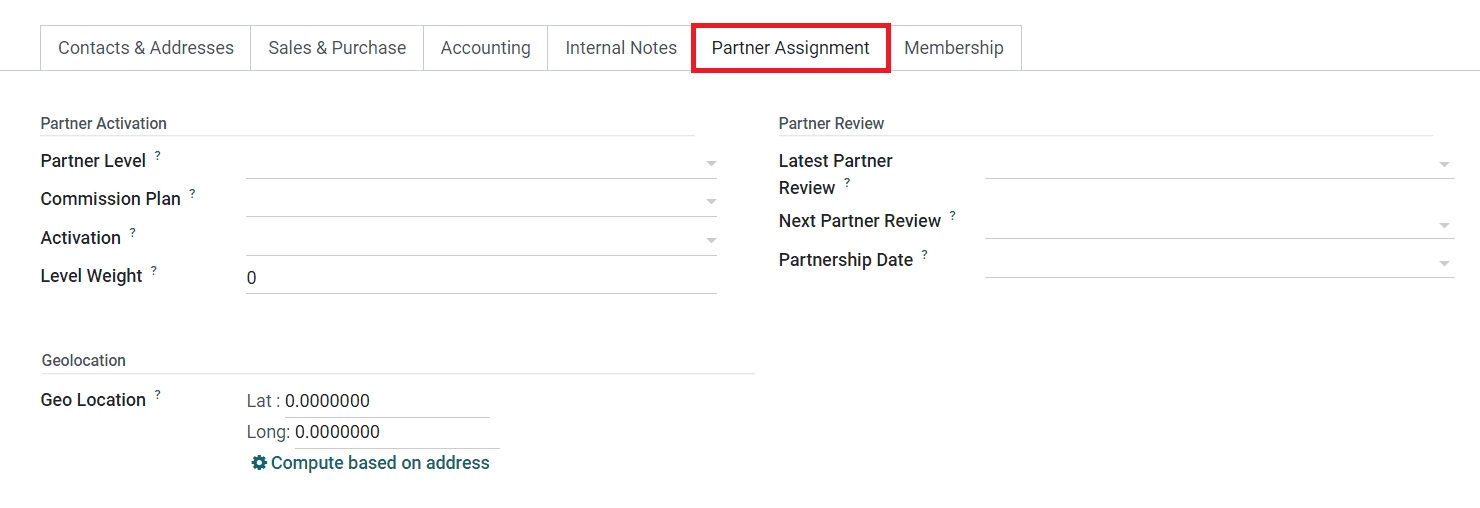
The Partner Assignment tab will assist you in congratulating the Partner Activation, Partner Review, and Geolocation details. Under the Partner Activation field, you can mention the Partner Level, Commission Plan, Activation, and Level Weight. The Partner Review field can be used to specify Latest Partner Review, Next Partner Review, and Partnership Date.
The Membership tab can be used to add the membership details of the customer.

If you want to give free membership to the customer, you can activate the Free Member option. A member to whom you want to associate the customer’s membership can be specified in the Associate Member field. The Current Membership Status of the customer can be seen on this tab. Using the Buy Membership button, you can easily buy a membership. The Join Date, Membership, Membership Price, Invoice, and Membership Status can be also observed in this tab.
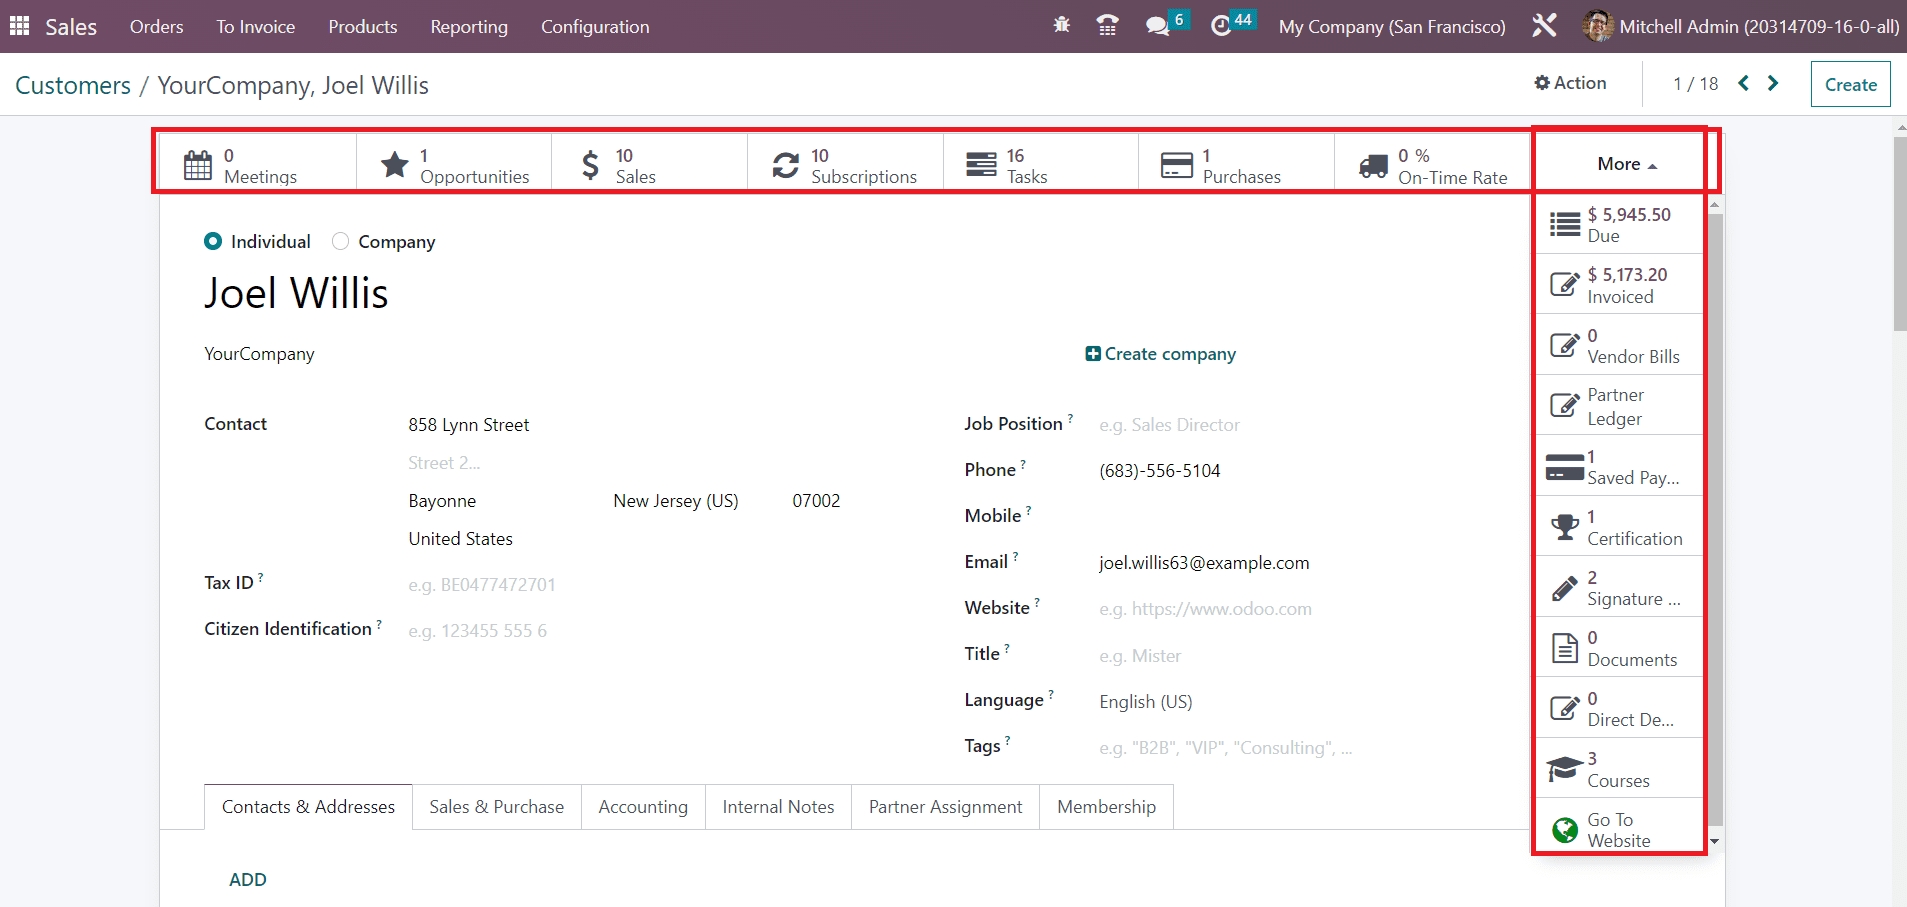
Based on the operations done with the customer, you will get smart buttons on the screen to manage each of those operations. Here, you can find the smart buttons for Meetings, Opportunities, Sales, Subscriptions, Tasks, Purchases, On Time Rate, Due, Invoiced Amount, Vendor Bills, Partner Ledger, Saved Payment Tokens, Certifications, Signature, Documents, Direct Debit Mandates, and Courses details of the customer Joel Willis.
Last updated